Start a new quote, fill in the customer and site, add line items from your library, and send it to the customer.
A quote is where everything in Conficient starts. Once the customer accepts it, you turn it into a project and claim against it. This guide builds a quote from scratch and sends it.Who can do this: anyone whose role includes Edit quotes. Out of the box that is the Owner and Project Manager roles. Site Supervisors and Viewers can open a quote, but they see Read-only (your role can’t edit quotes) under its title and every field is locked.
1
Open Quotes and press New quote
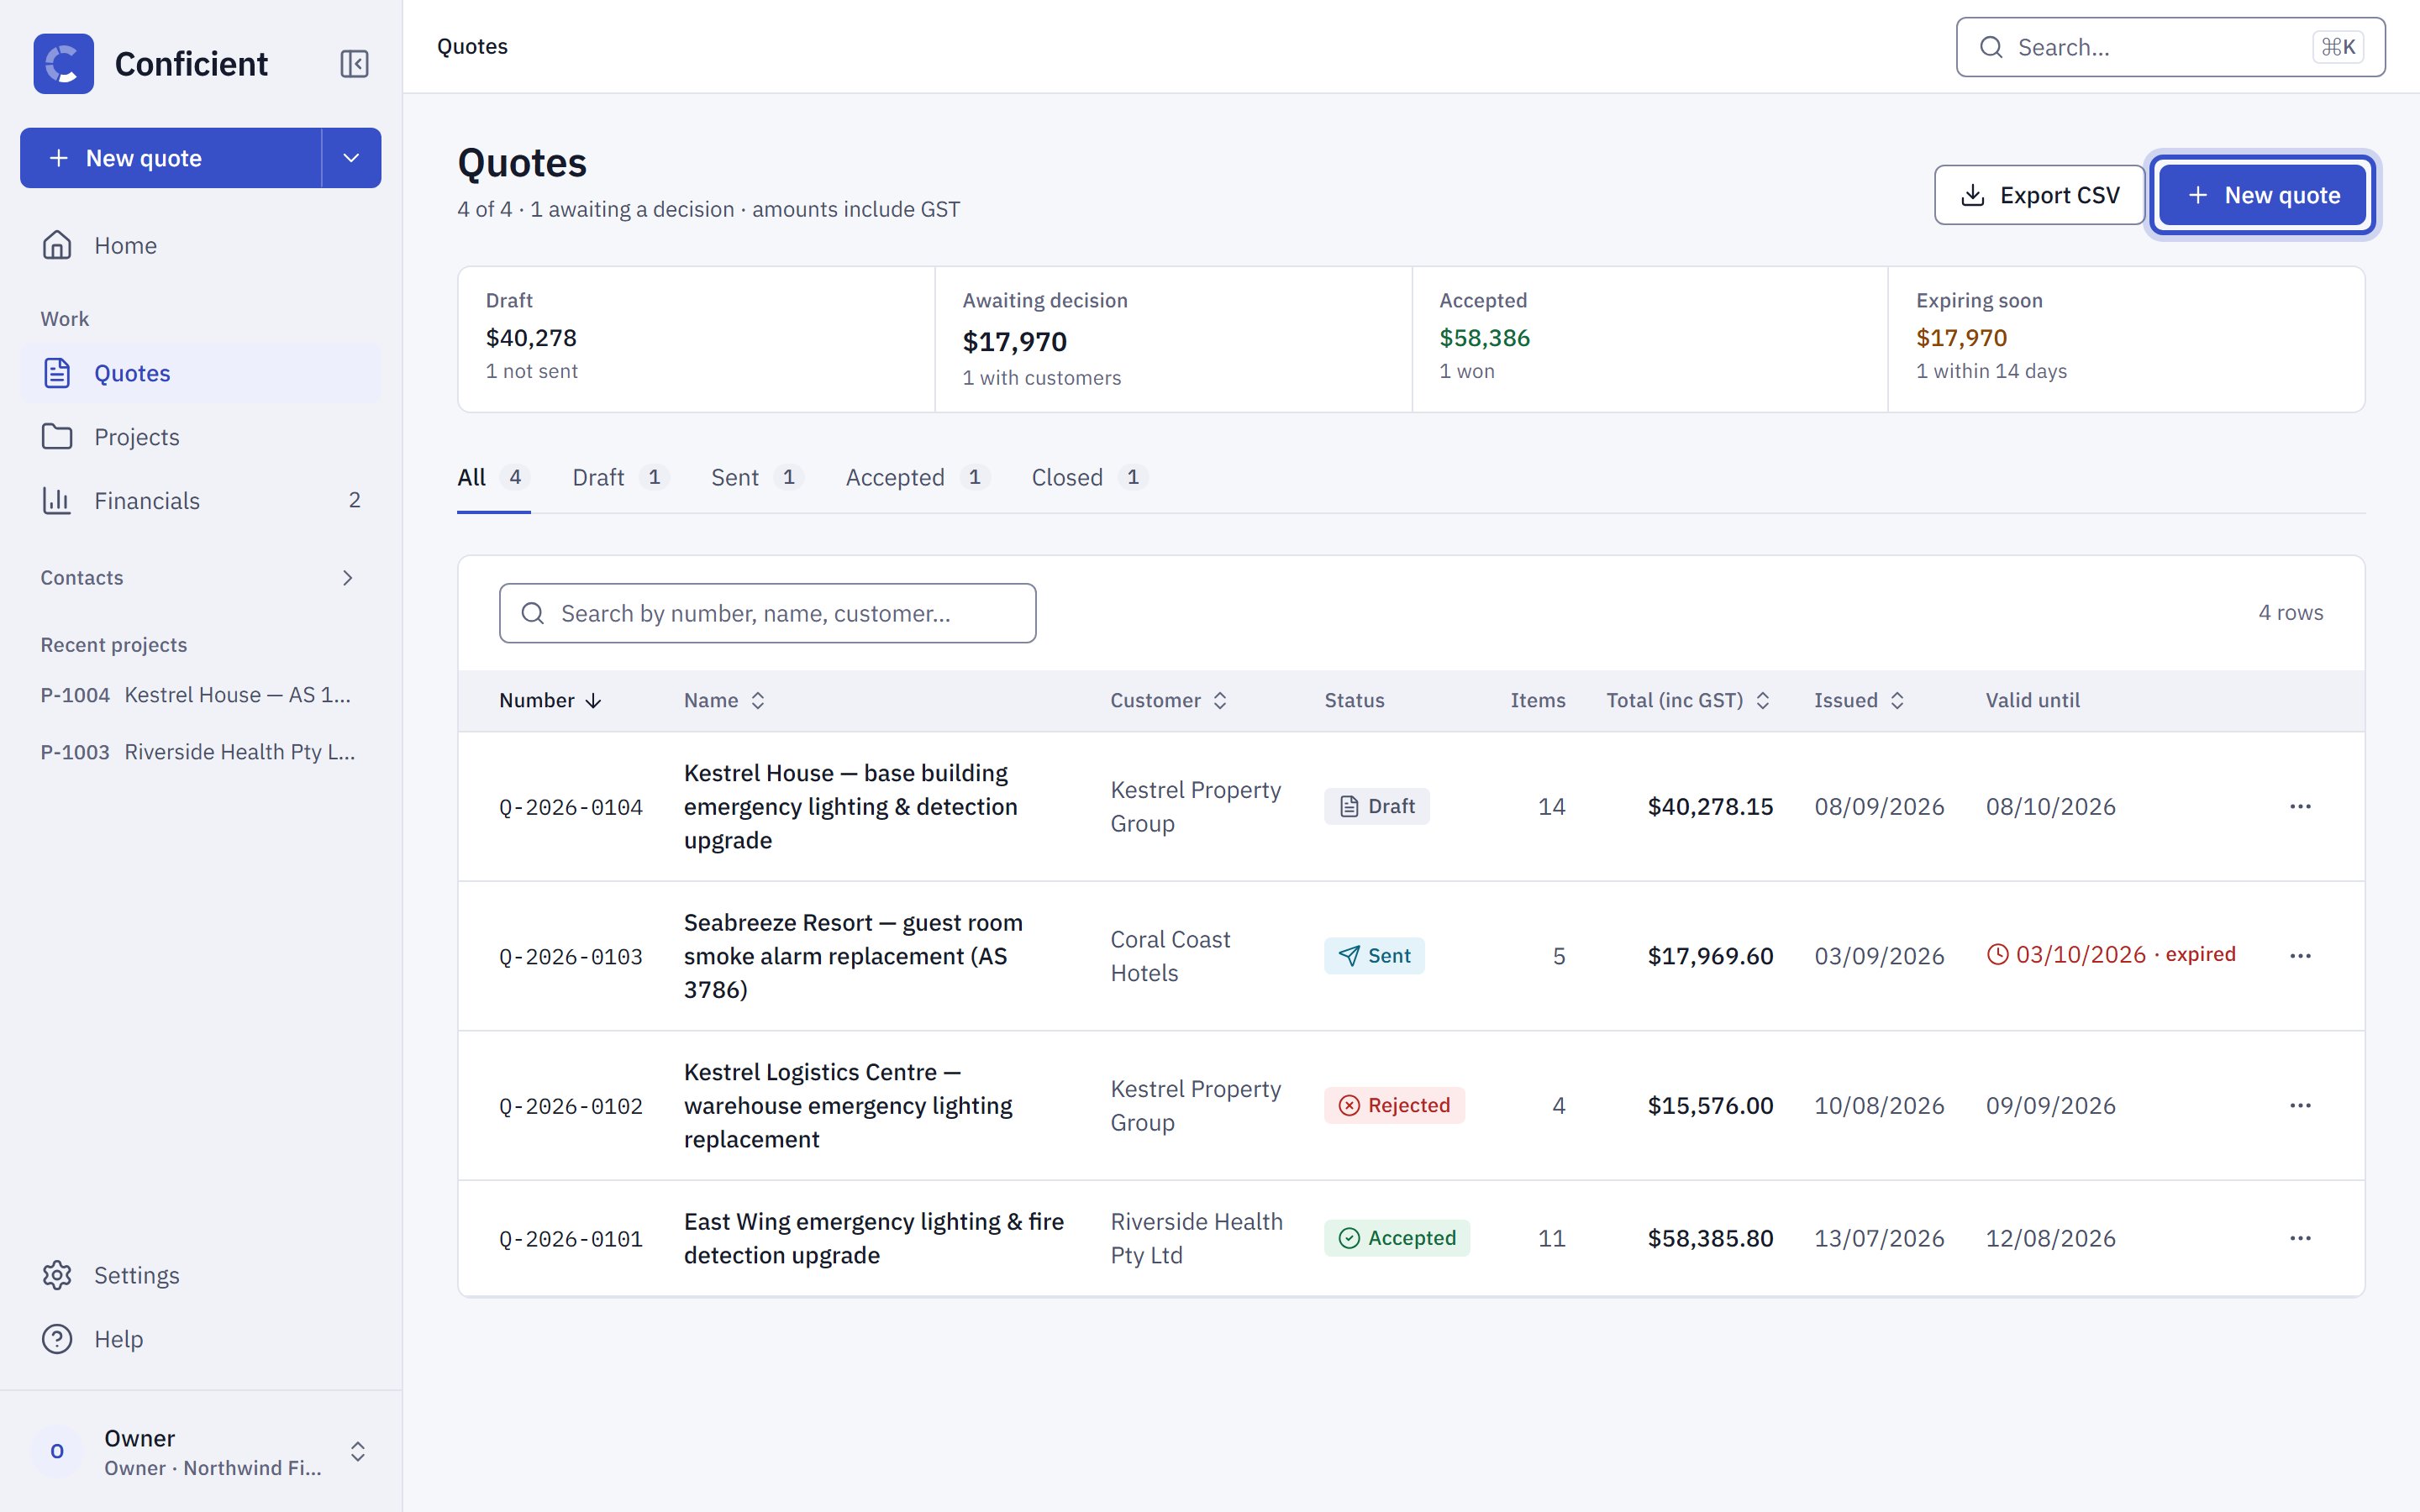
Choose Quotes in the sidebar. The list shows every quote with its status and total, and the tabs above the table filter by status. Press New quote at the top right. The New quote button at the top of the sidebar does the same from any page.
The Quotes list. New quote is at the top right.
2
A new draft opens
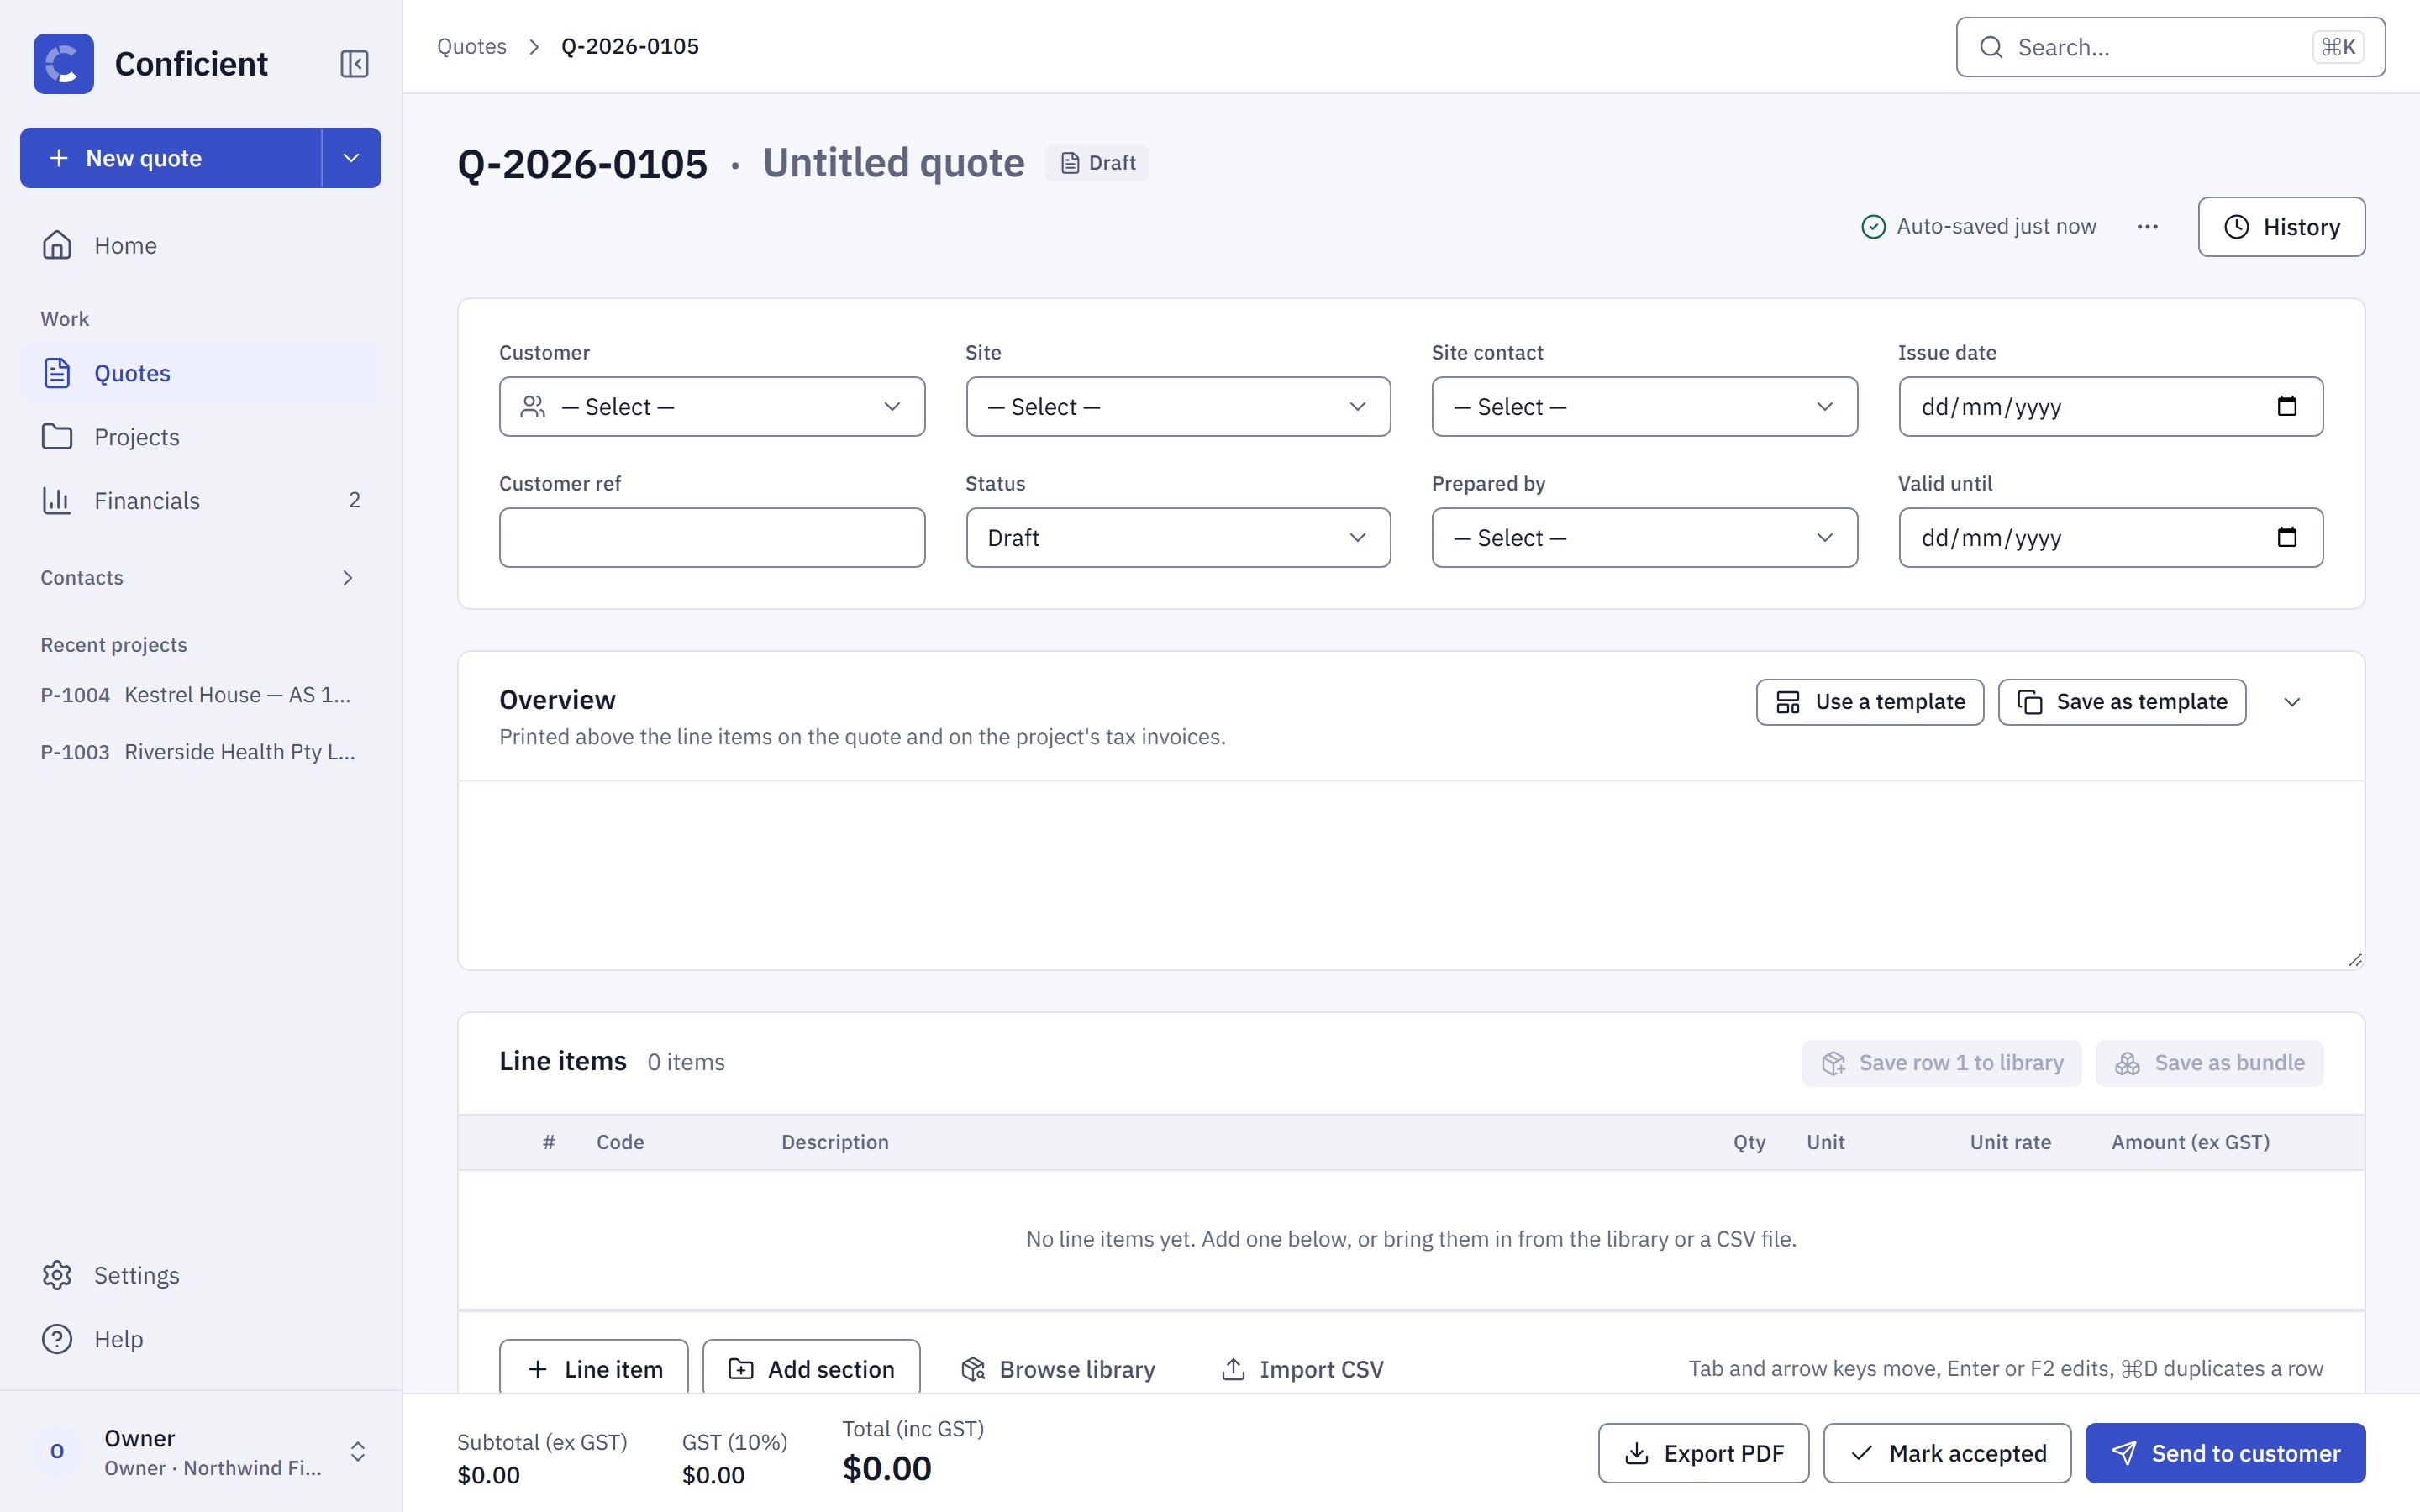
Conficient creates the quote straight away, gives it the next number and opens it in the editor with the status Draft. There is no Save button. The editor saves by itself a moment after every change, and the words under the title say when it last saved.
A new draft, numbered and ready to fill in.
3
Name the quote
Click the words Untitled quote beside the number and type a name the customer will recognise, usually the site and the job. The name prints on the quote and shows in the Quotes list.
4
Fill in the customer, site and dates
In the details card:
Customer: pick one of your customers. If your role can manage customers (out of the box, the Owner), + Create new customer… at the end of the list adds one without leaving the quote.
Site and Site contact: only that customer’s sites and contacts are listed. They can be created in place the same way.
Issue date and Valid until: the dates printed on the quote. Once a sent quote’s Valid until date has passed, the Quotes list marks it expired, and it counts down the last 14 days before that.
Customer ref: the customer’s own order or reference number, if they gave you one. It prints on the quote.
The details card, with the Customer field outlined.
5
Write the overview, or insert a template
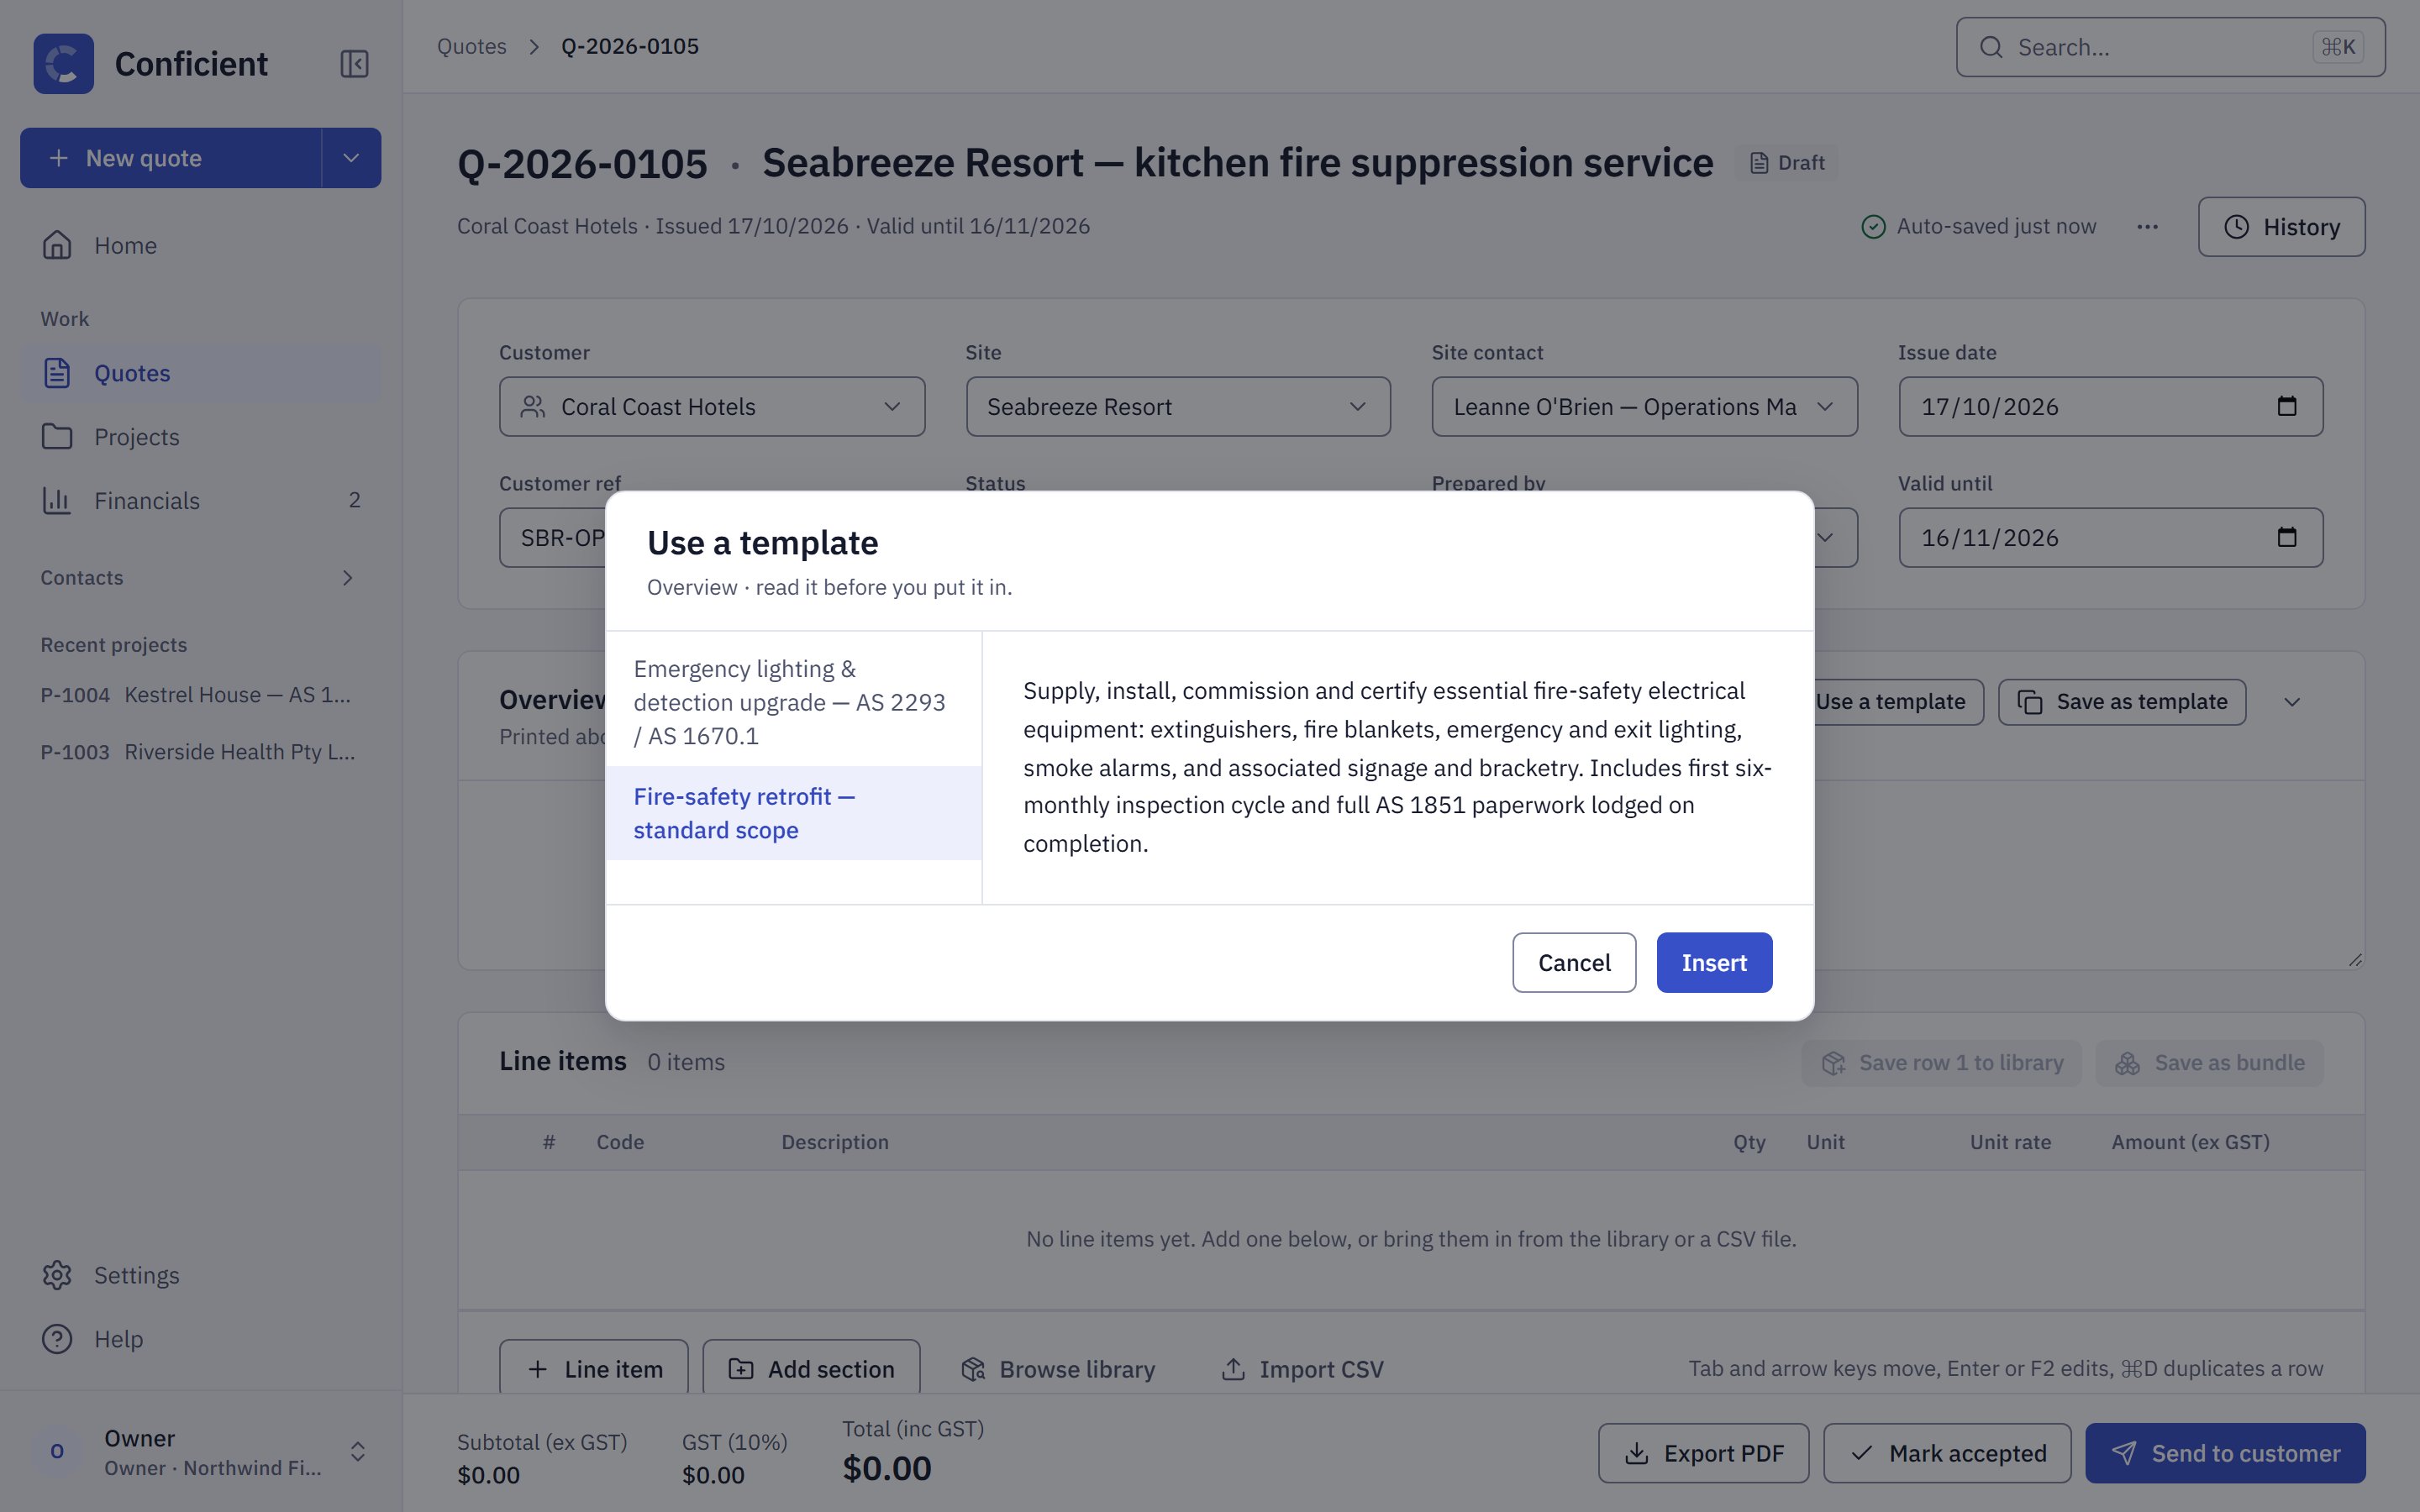
The Overview prints above the line items. Type it, or press Use a template to read a saved wording first and then Insert it. If you have already written something, the buttons become Replace and Add to what’s there. Save as template keeps your own wording for next time.
Read a template before you put it in.
6
Add line items
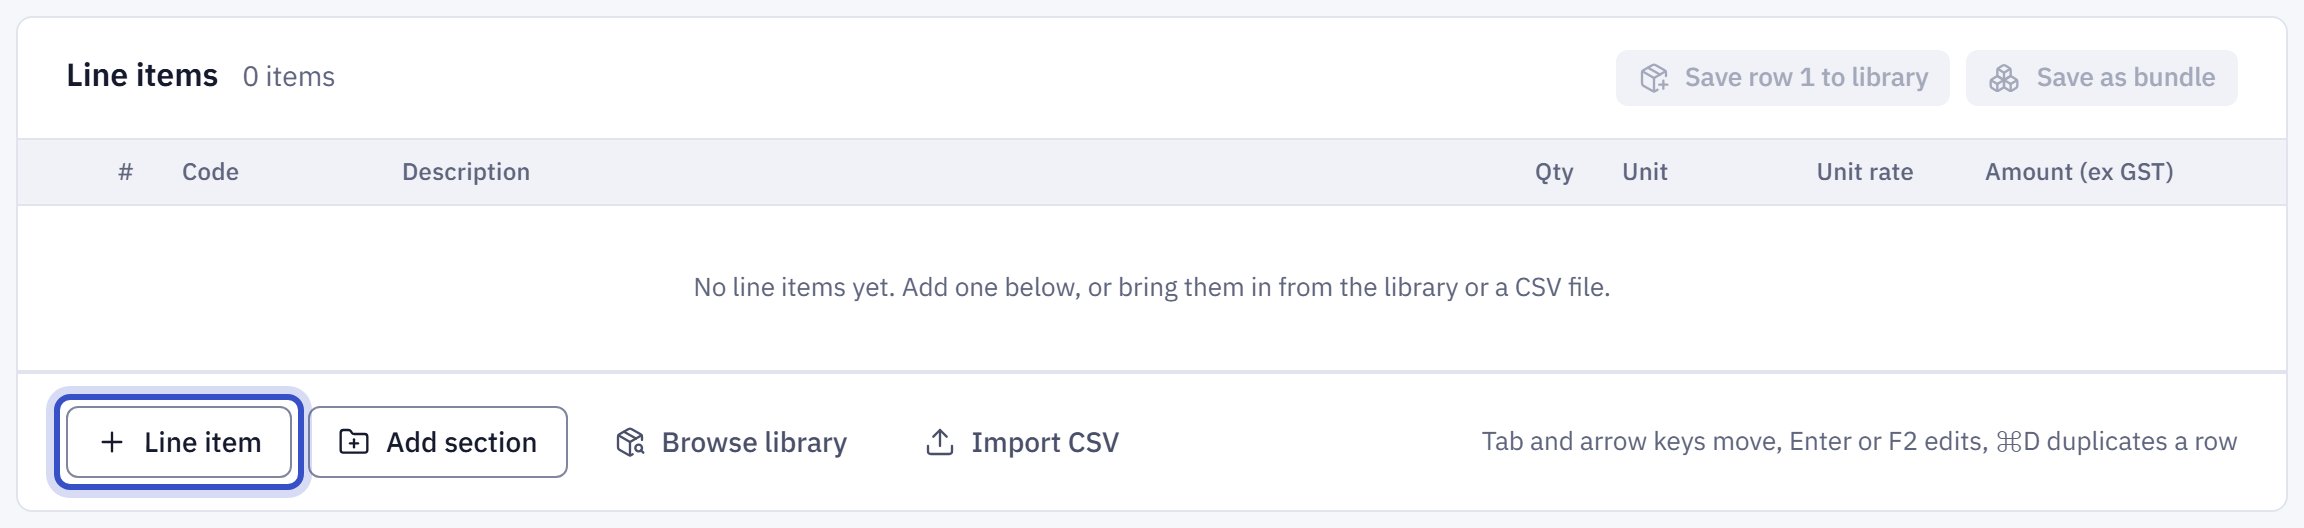
The line items grid works like a spreadsheet: click a cell and type, press Enter to finish, and use Tab or the arrow keys to move. Press Line item under the grid to add a row.The other buttons in that bar: Add section splits a long quote into named sections, each with its own subtotal; Browse library inserts several library items at once; Import CSV brings rows in from a spreadsheet.
An empty grid. Line item adds a row.
7
Pick items from your library
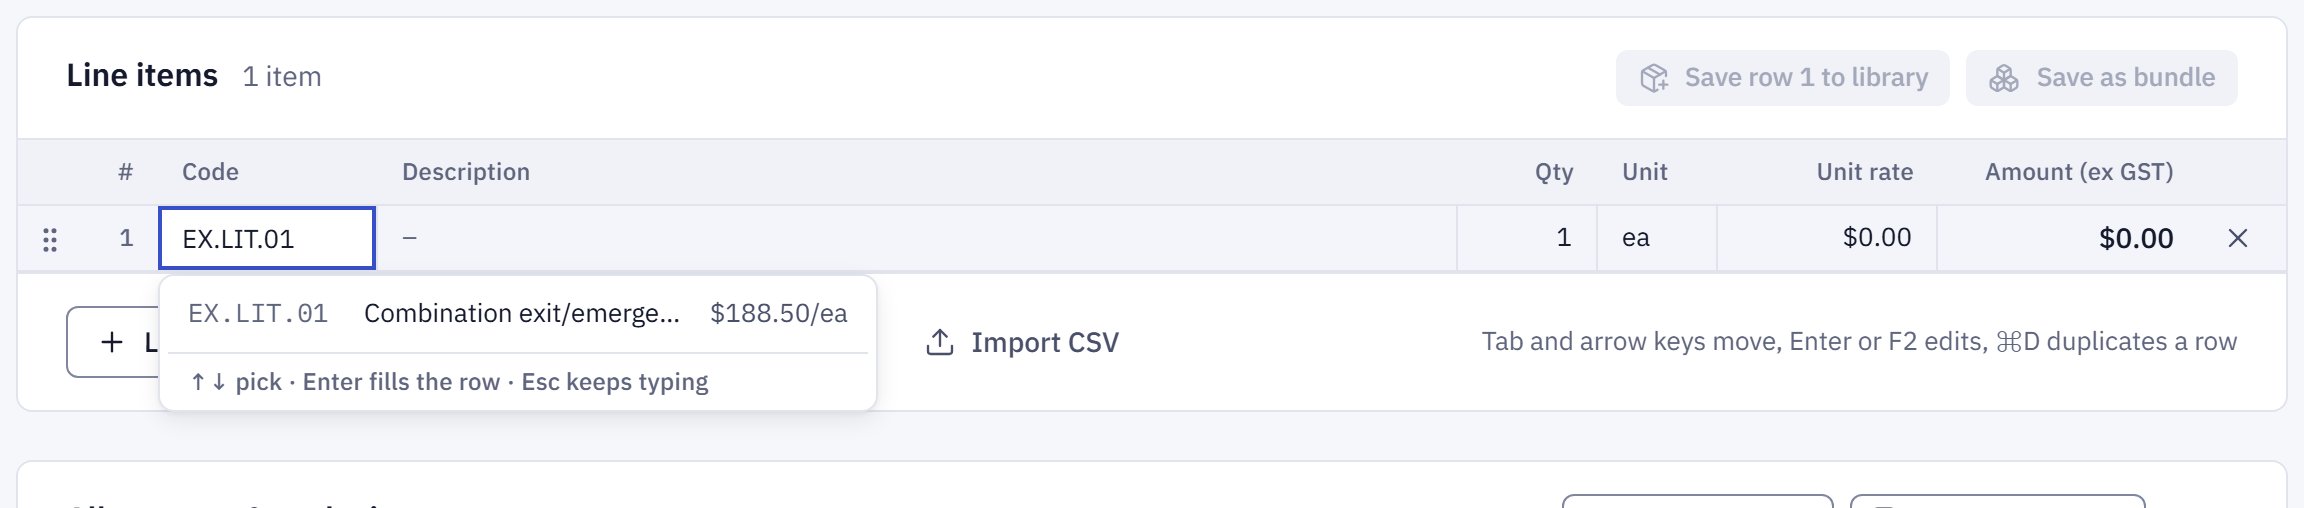
Click the new row’s Code cell and start typing a code or a few words of the description. Matching items from your line-item library appear underneath with their unit and rate. Highlight one with the arrow keys and press Enter: the code, description, unit and rate fill in, and the selection moves to Qty so you can type the quantity straight away.
Typing a code offers the matching library items.
8
Type a one-off line by hand
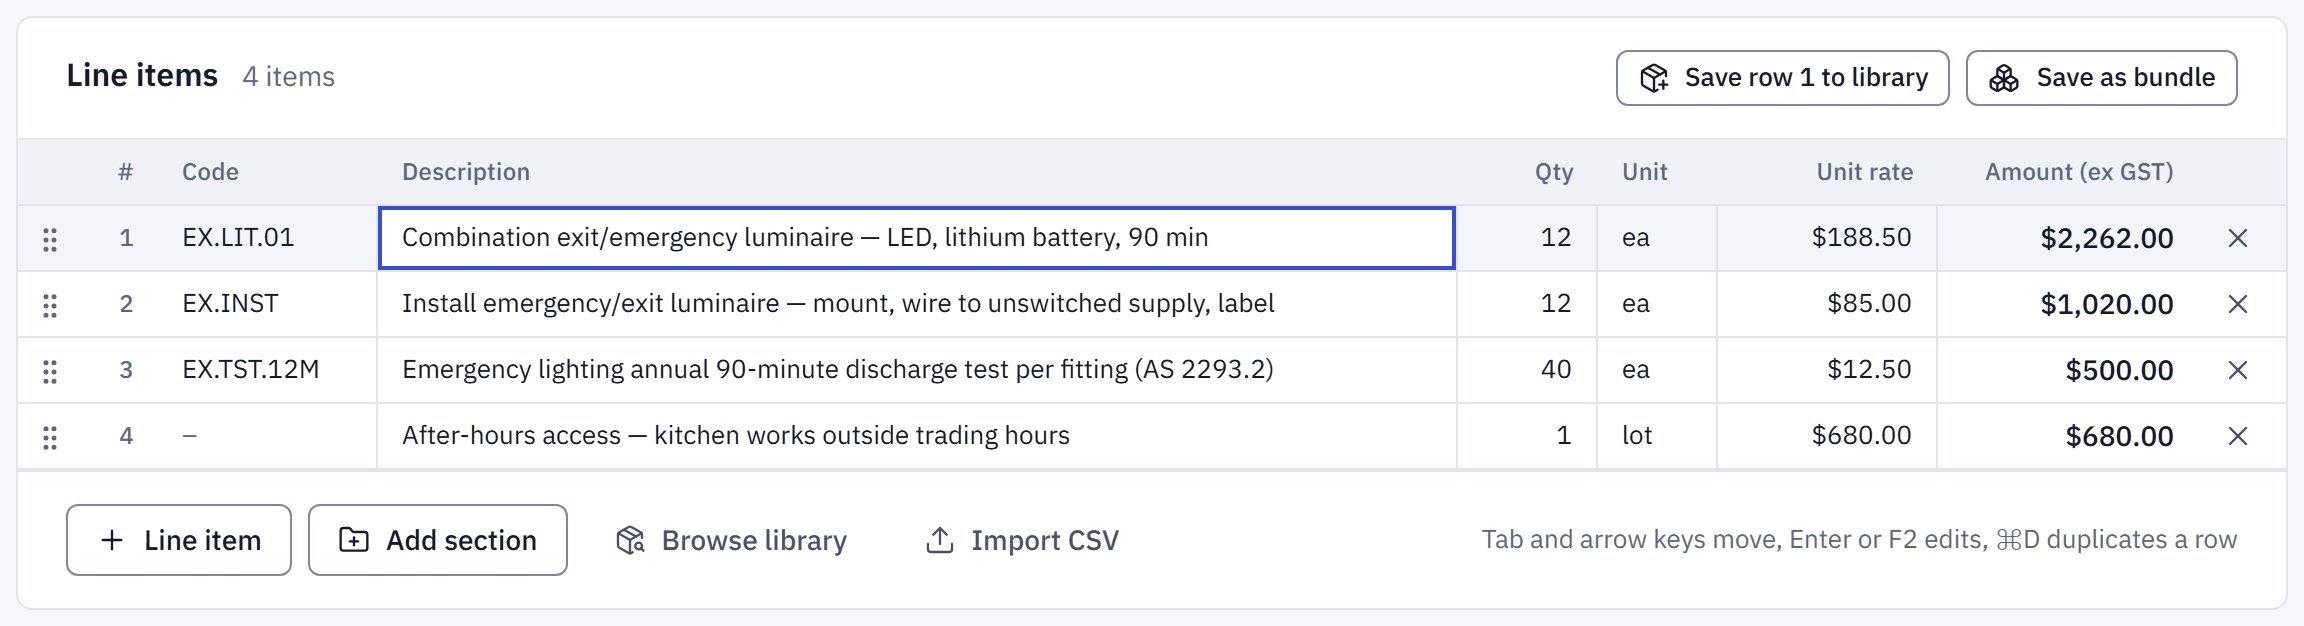
A line that is not in your library is typed cell by cell: description, quantity, unit and unit rate. The row’s amount and the totals at the bottom update each time you finish a cell. If you will use the line again, select the row and press Save row 4 to library at the top right of the Line items card (the number follows the selected row). Only roles that may manage the library see that button; out of the box, the Owner.
Three library lines and one typed by hand.
9
Check the totals
The bar at the bottom of the screen always shows the subtotal, the GST and the total including GST, with the quote’s actions beside them. Export PDF opens the printed quote in a new tab, with your browser’s print window ready; choose Save as PDF there to keep a file.
The totals bar, with Send to customer outlined.
10
Send it to the customer
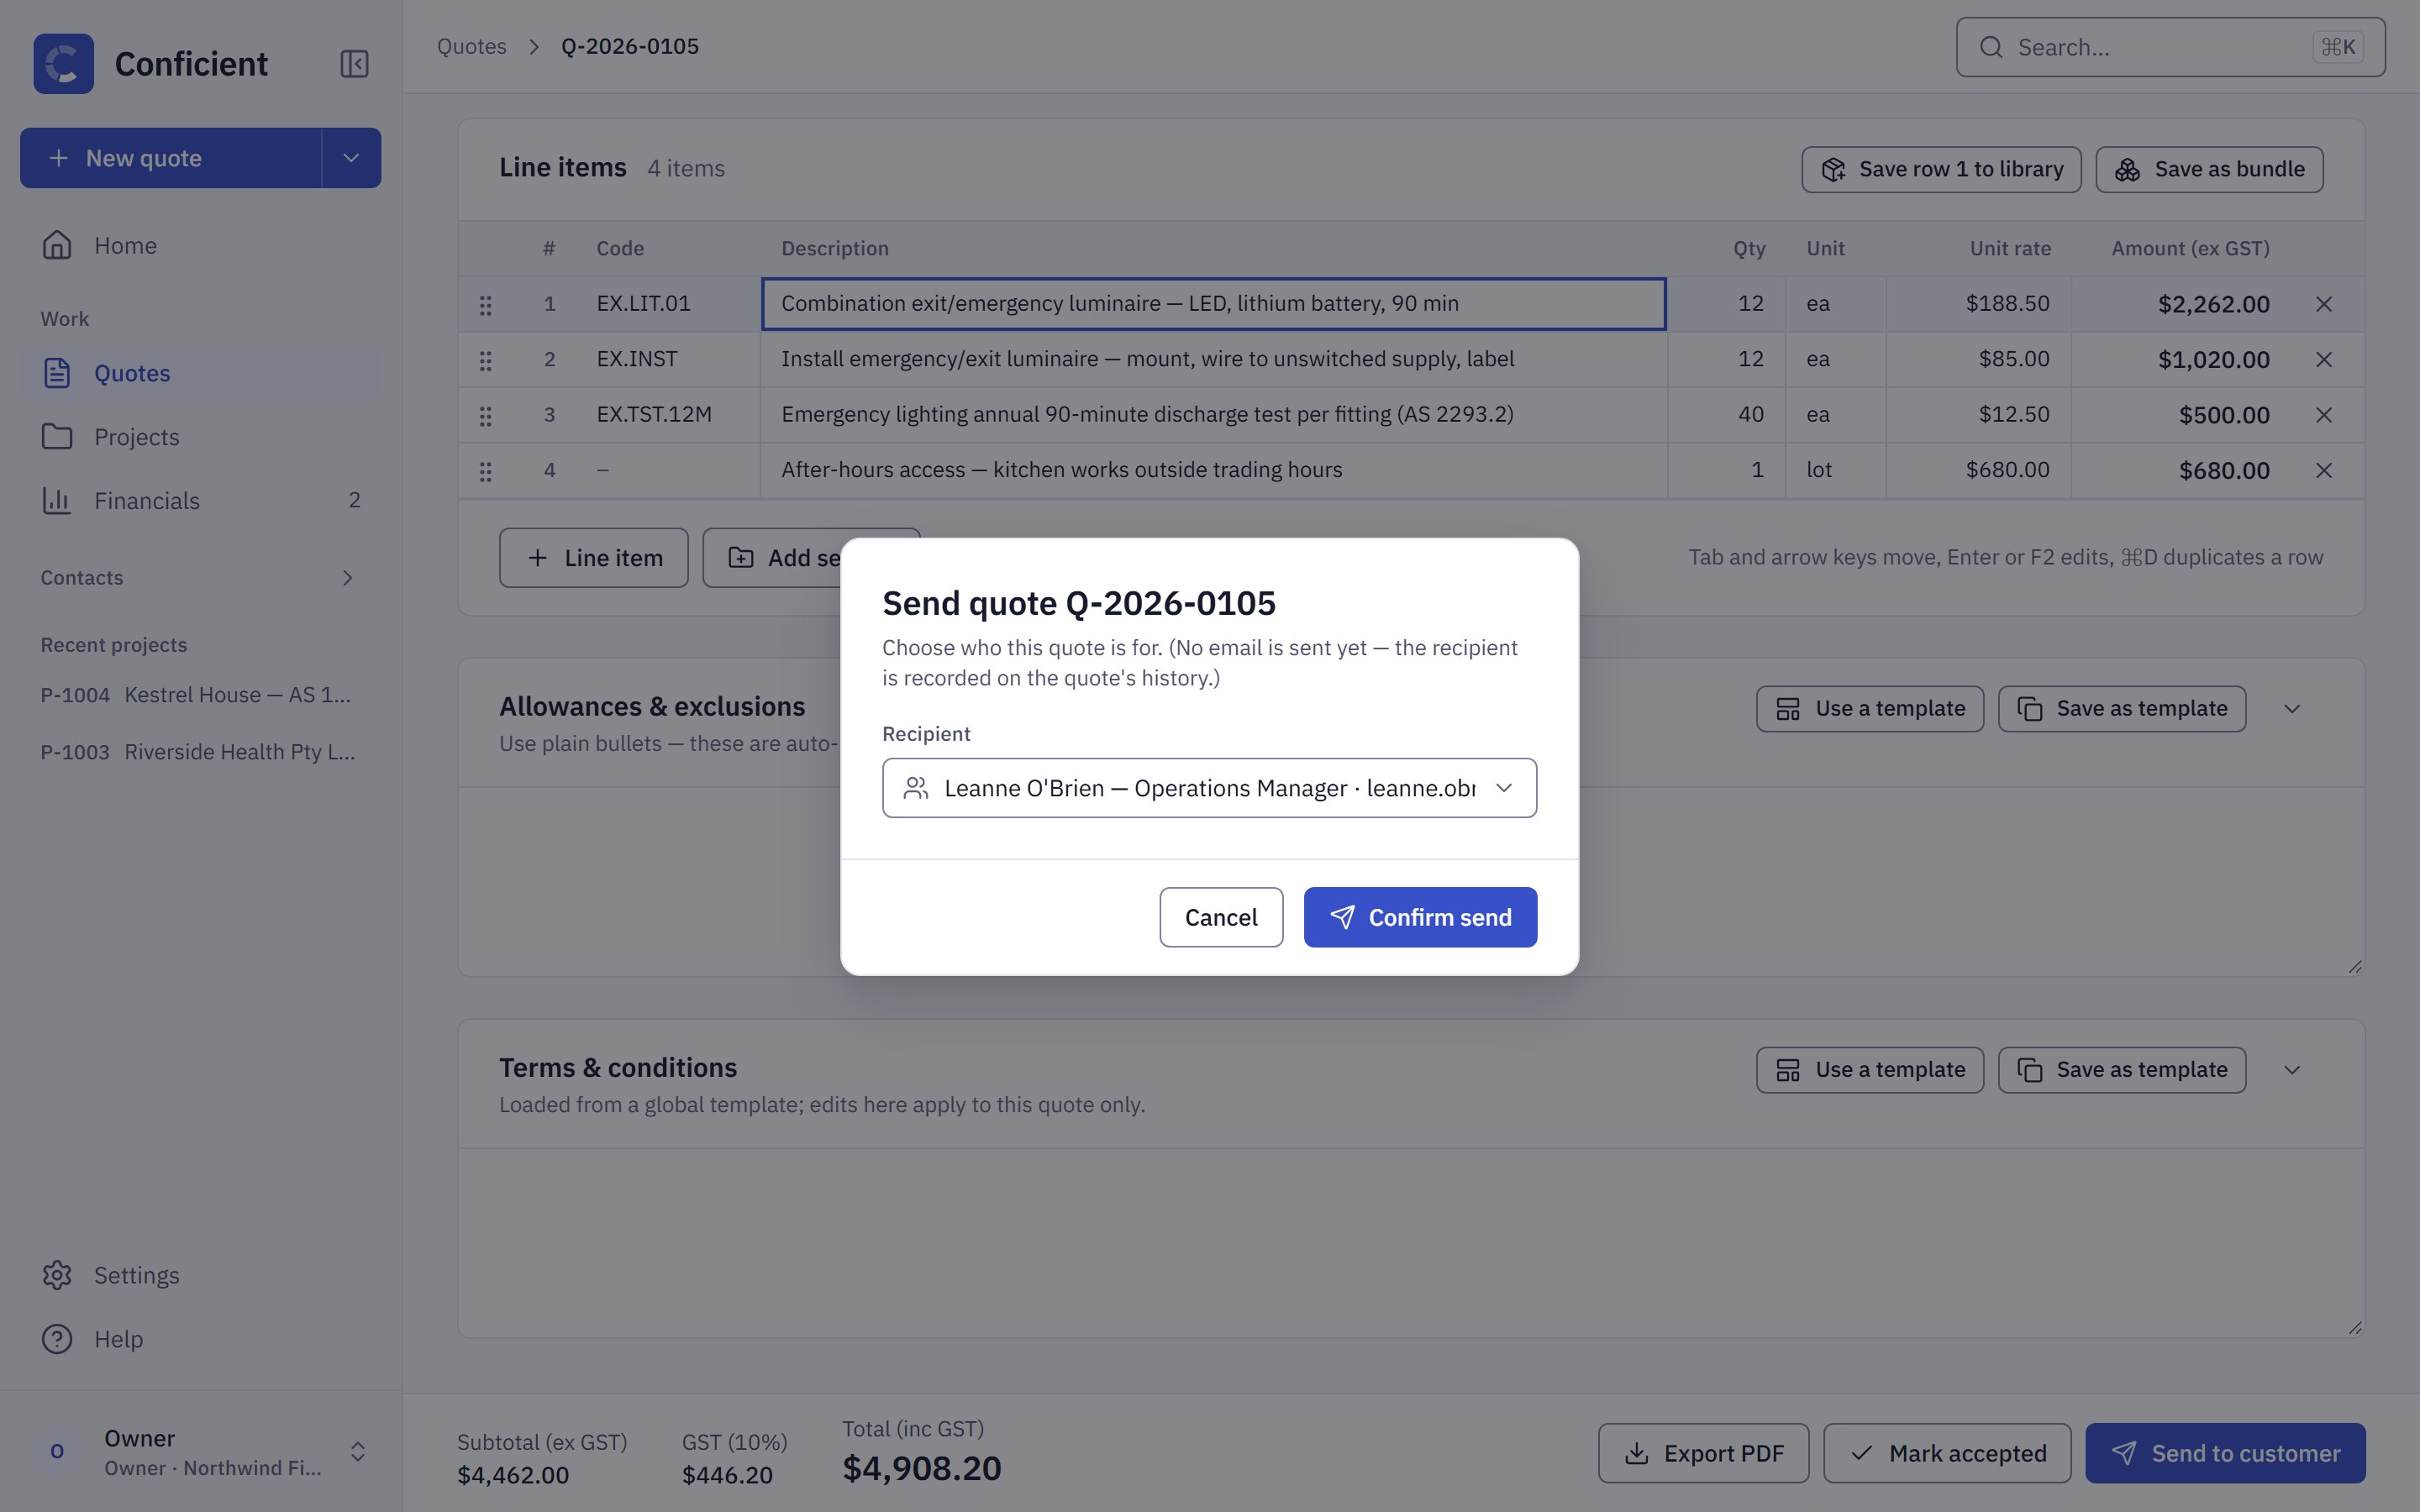
Press Send to customer, choose who it is going to, and press Confirm send. The customer’s contacts who have an email address are offered, or you can type an address.
Conficient records who the quote went to; it does not email it yet. Export the PDF and send it the way you normally would.
11
The quote is now Sent
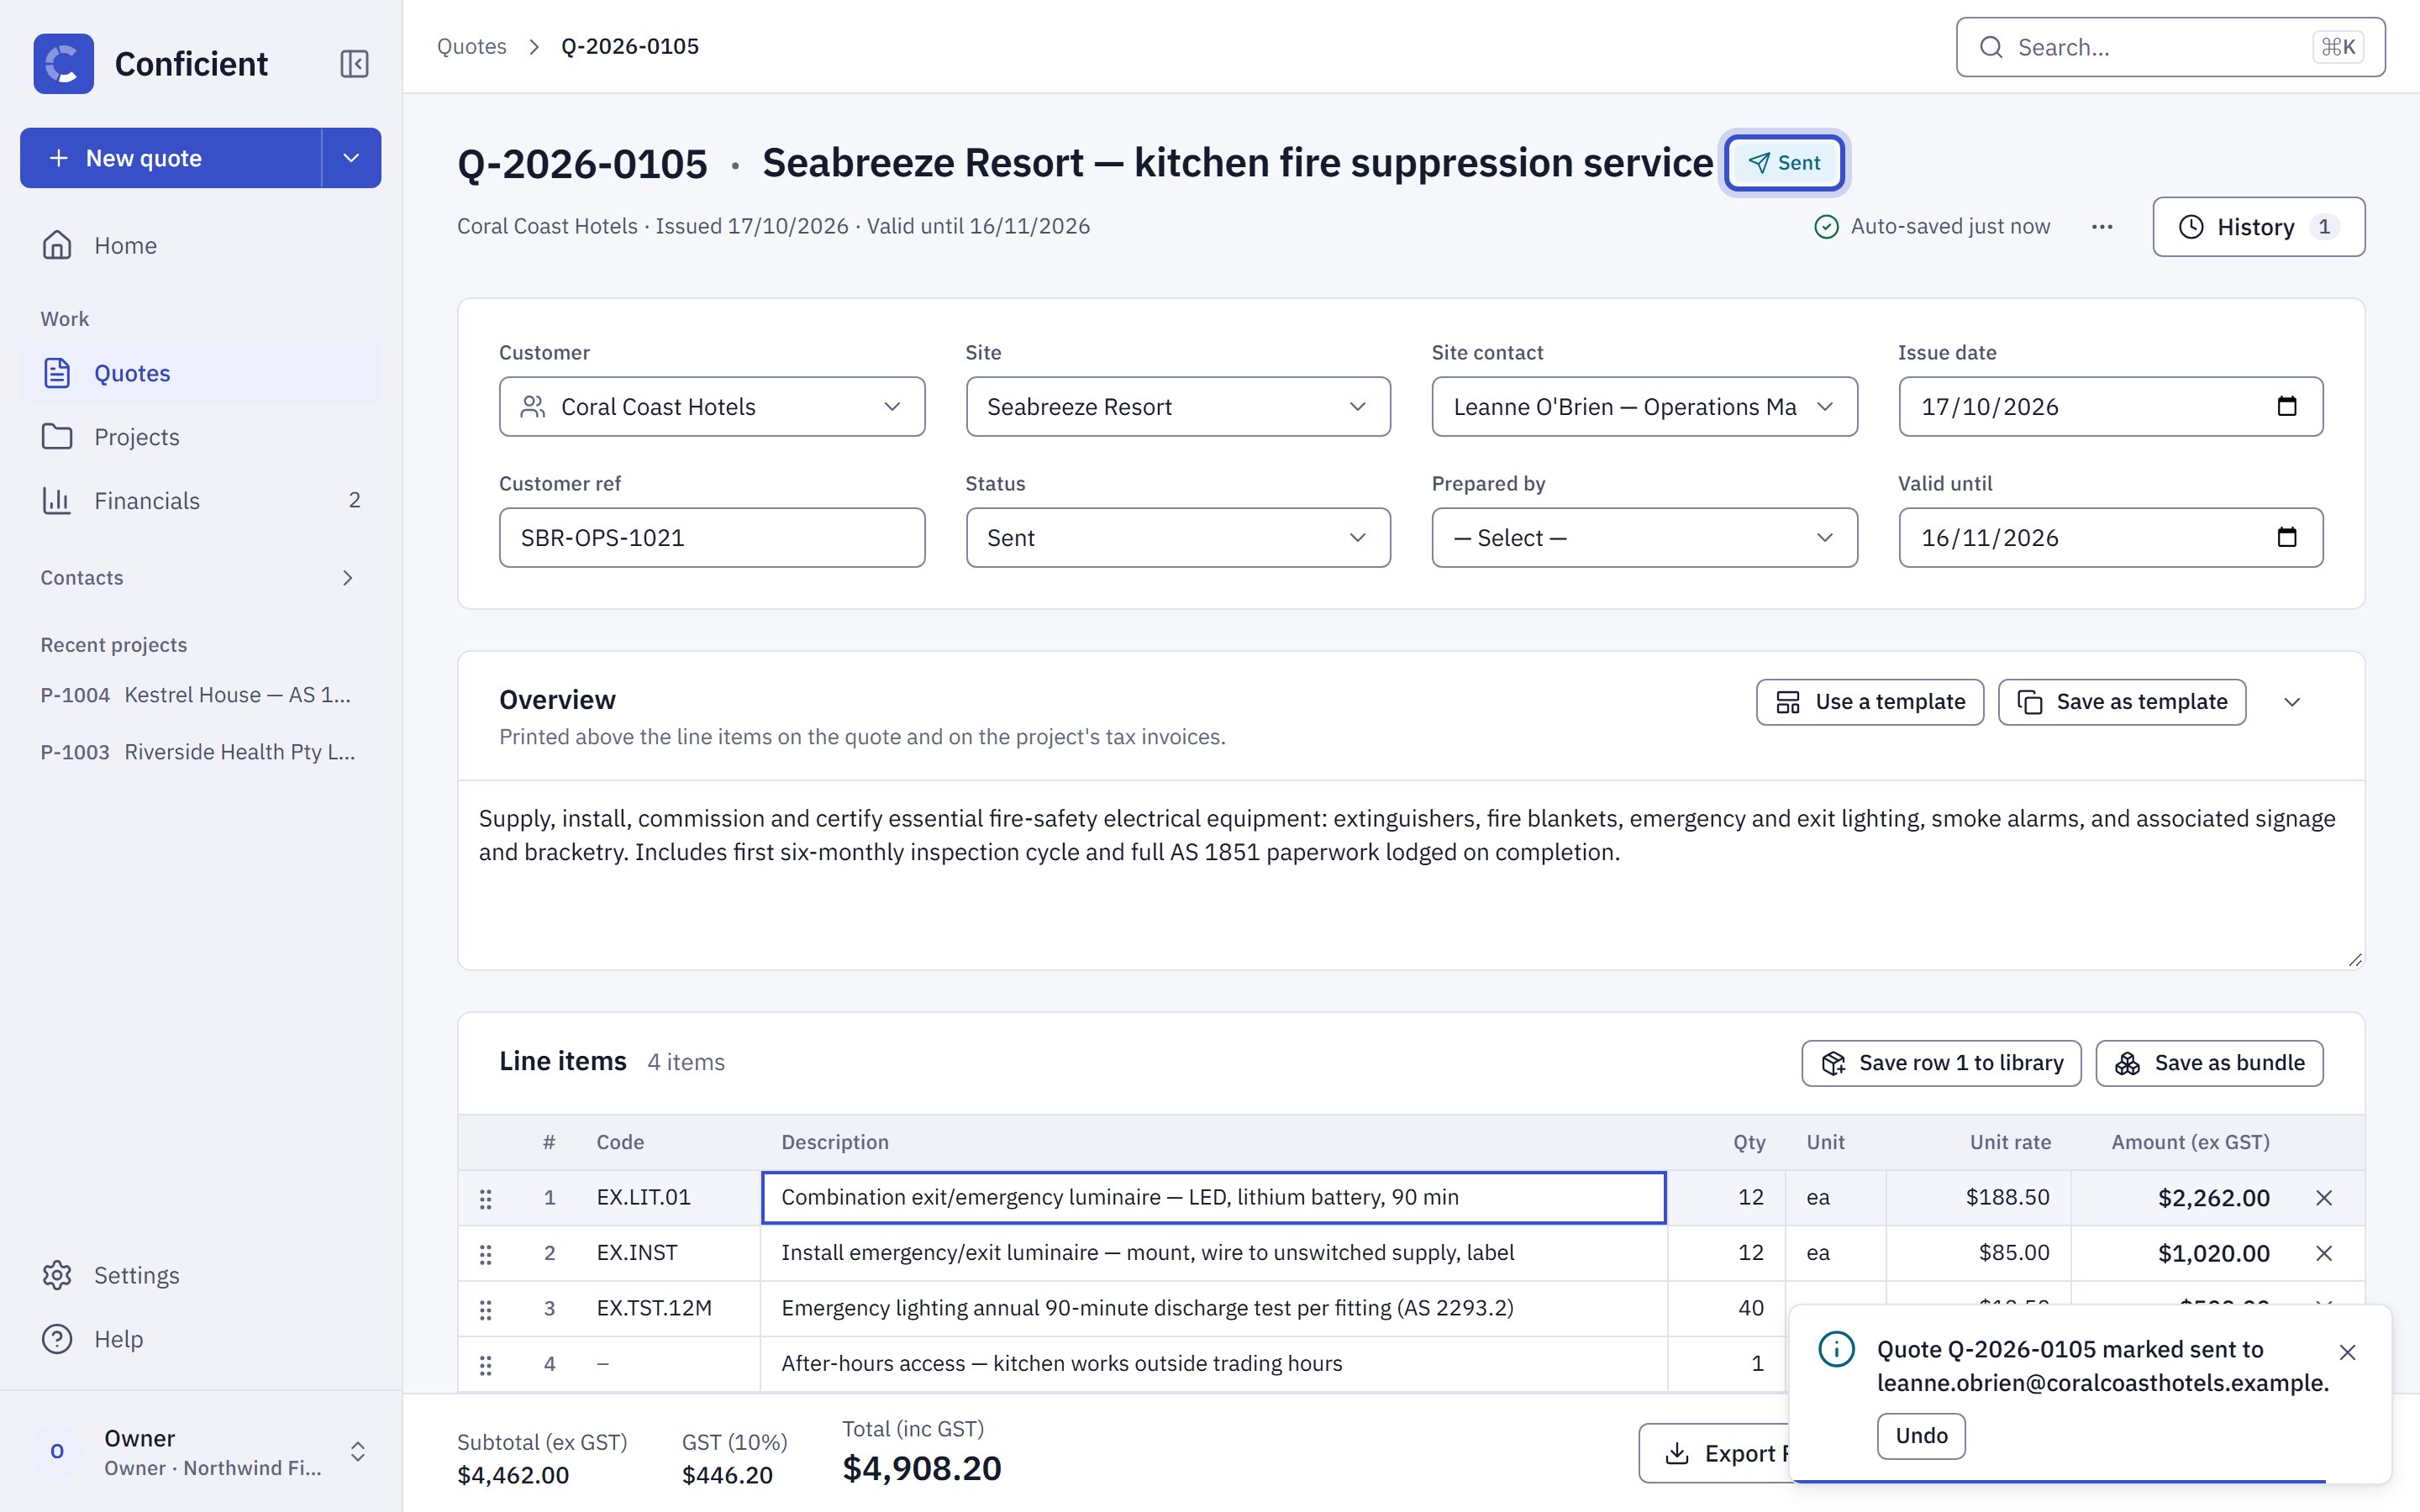
The status badge beside the name changes to Sent. Sent it by mistake? Press Undo in the message at the bottom right within a few seconds and it goes back to Draft.
Sent, with the Undo message still showing.
Once the message has gone, the actions in the totals bar are Mark rejected and Mark accepted, for when the customer decides.
A sent quote's actions.
12
What the customer sees
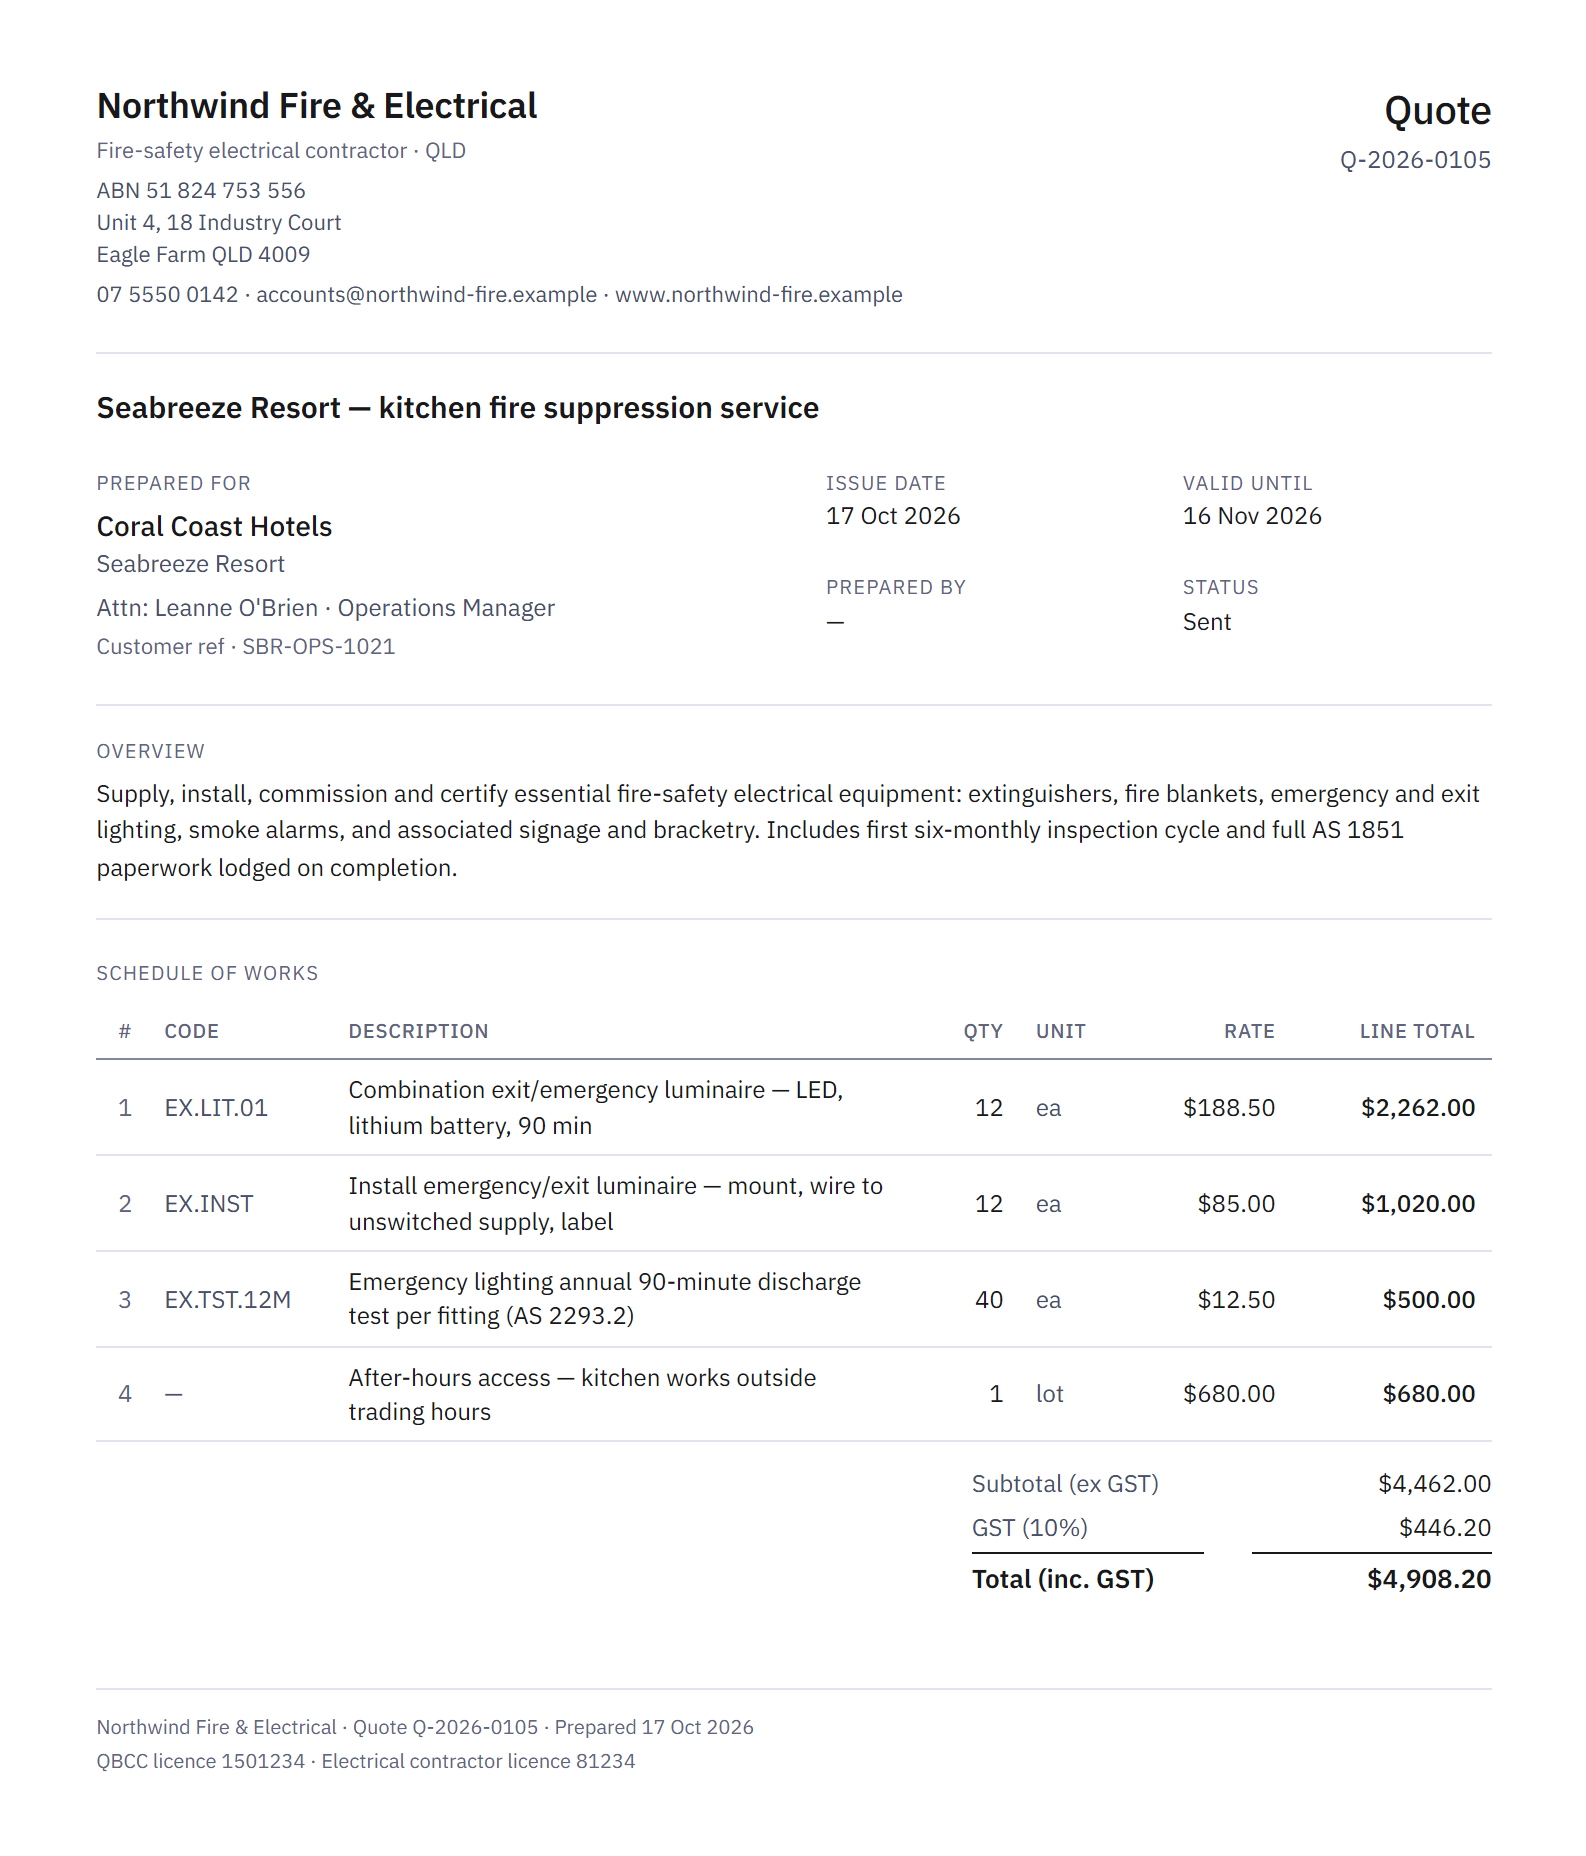
Export PDF prints the quote on your letterhead, with the overview, the line items and totals, and any allowances, exclusions and terms you added.
Allowances & exclusions and Terms & conditions sit under the line items, with the same Use a template and Save as template buttons. Put your standard terms in once as a template and insert them on every quote.
Mark accepted works straight from Draft, for a quote the customer agreed to in person or by phone.
Duplicate, in the ”…” menu beside History, copies a quote into a new draft. Handy for repeat work.
Save version, in the same menu, keeps a restore point in the quote’s History. Autosaves do not, so save a version before a big rework.
Sections carry through to the project: budgets, claims and costs can be tracked section by section.
When the customer accepts, press Mark accepted and then Convert to project. The project’s contract value is the quote’s subtotal (ex GST), and the quote’s line items and sections become the project’s claim schedule, ready for the first progress claim.
{"docsConfig":{"theme":"mint","$schema":"https://mintlify.com/docs.json","name":"Conficient Help","description":"How to use Conficient: quotes, projects, progress claims, purchases and settings.","colors":{"primary":"#3850C7","light":"#8B9CFF","dark":"#3448BD"},"logo":{"light":"https://mintcdn.com/conficient/u15AY9Pv4fMreuyc/logo/lockup-light.svg?fit=max\u0026auto=format\u0026n=u15AY9Pv4fMreuyc\u0026q=85\u0026s=6e368a01c30a5a1328f190ba0e3c62b9","dark":"https://mintcdn.com/conficient/u15AY9Pv4fMreuyc/logo/lockup-dark.svg?fit=max\u0026auto=format\u0026n=u15AY9Pv4fMreuyc\u0026q=85\u0026s=9699ec7896242407a6f4282ec5fb716f"},"favicon":"https://mintcdn.com/conficient/u15AY9Pv4fMreuyc/favicon.svg?fit=max\u0026auto=format\u0026n=u15AY9Pv4fMreuyc\u0026q=85\u0026s=b93bd28717ecb9900205be6d7a257cf5","appearance":{"default":"system"},"fonts":{"family":"IBM Plex Sans"},"styling":{"latex":false},"navigation":{"pages":[]}},"deployment":{"deploymentMetadataValue":{"subdomain":"conficient","hasAudioNarration":false,"actualSubdomain":"conficient","customDomains":["help.conficient.io"],"gitSource":{"type":"github","owner":"spatialinfinity","repo":"conficient-help","deployBranch":"main","contentDirectory":"","isPrivate":true,"mountPath":"","label":""},"chroma":{"latestBuiltDeploymentHistoryId":"6ad302d445eaf7eeaa1818d2","collectionId":"eec57a4f-ec59-4812-837e-b11a877a9ae6","liveDeploymentHistoryId":"6ad302d445eaf7eeaa1818d2","schemaVersion":"v3"},"entitlements":{"AI_CHAT":{"status":"ENABLED"},"WEB_MCP":{"status":"ENABLED"},"NARRATION":{"status":"ENABLED"}},"buildId":"6ad309cd45eaf7eeaa1843eb","clientVersion":"0.0.3879","searchFilterCounts":[{"language":"default","tag":"Getting Started","count":2}]},"assistantConfig":{"enableAskAiButton":false,"enableStarterQuestions":false,"enableContextualStarterQuestions":false,"enableAskAiSearchBar":true},"hasChatPermissions":true,"hasWebMcpPermissions":true,"toggles":[{"name":"kill-isr","enabled":true,"variant":{"name":"disabled","enabled":false,"feature_enabled":true},"impressionData":false},{"name":"agent-mintlify-slack","enabled":true,"variant":{"name":"disabled","enabled":false,"feature_enabled":true},"impressionData":false},{"name":"editor-v7-file-tree","enabled":true,"variant":{"name":"disabled","enabled":false,"feature_enabled":true},"impressionData":false},{"name":"agent-integrations-settings","enabled":true,"variant":{"name":"disabled","enabled":false,"feature_enabled":true},"impressionData":false},{"name":"automations-pr-grouping","enabled":true,"variant":{"name":"disabled","enabled":false,"feature_enabled":true},"impressionData":false},{"name":"custom-prefix","enabled":true,"variant":{"name":"disabled","enabled":false,"feature_enabled":true},"impressionData":false},{"name":"analytics-v7","enabled":true,"variant":{"name":"disabled","enabled":false,"feature_enabled":true},"impressionData":false},{"name":"user-flows-analytics","enabled":true,"variant":{"name":"disabled","enabled":false,"feature_enabled":true},"impressionData":false},{"name":"no-publish-flow","enabled":true,"variant":{"name":"disabled","enabled":false,"feature_enabled":true},"impressionData":false},{"name":"llms-txt-v2","enabled":true,"variant":{"name":"disabled","enabled":false,"feature_enabled":true},"impressionData":false},{"name":"pause-universal-search-reconcile","enabled":true,"variant":{"name":"disabled","enabled":false,"feature_enabled":true},"impressionData":false},{"name":"snapshot-serving-live","enabled":true,"variant":{"name":"disabled","enabled":false,"feature_enabled":true},"impressionData":false},{"name":"stripTemperatureMiddleware","enabled":true,"variant":{"name":"disabled","enabled":false,"feature_enabled":true},"impressionData":false},{"name":"per-site-search-delta","enabled":true,"variant":{"name":"disabled","enabled":false,"feature_enabled":true},"impressionData":false},{"name":"support-platform-pylon-zendesk","enabled":true,"variant":{"name":"disabled","enabled":false,"feature_enabled":true},"impressionData":false},{"name":"editor-branches-v2-autocommit","enabled":true,"variant":{"name":"disabled","enabled":false,"feature_enabled":true},"impressionData":false},{"name":"editor-branches-v2","enabled":true,"variant":{"name":"disabled","enabled":false,"feature_enabled":true},"impressionData":false},{"name":"snapshot-serving","enabled":true,"variant":{"name":"disabled","enabled":false,"feature_enabled":true},"impressionData":false},{"name":"instant-rollback","enabled":true,"variant":{"name":"disabled","enabled":false,"feature_enabled":true},"impressionData":false},{"name":"granular-notifications-server","enabled":true,"variant":{"name":"disabled","enabled":false,"feature_enabled":true},"impressionData":false},{"name":"granular-notifications","enabled":true,"variant":{"name":"disabled","enabled":false,"feature_enabled":true},"impressionData":false},{"name":"editor-private-page-search","enabled":true,"variant":{"name":"disabled","enabled":false,"feature_enabled":true},"impressionData":false},{"name":"automations-fable","enabled":true,"variant":{"name":"disabled","enabled":false,"feature_enabled":true},"impressionData":false},{"name":"fixed-ai-action-pricing","enabled":true,"variant":{"name":"disabled","enabled":false,"feature_enabled":true},"impressionData":false},{"name":"automation-resolve-merge-conflict","enabled":true,"variant":{"name":"disabled","enabled":false,"feature_enabled":true},"impressionData":false},{"name":"scoped-publishing","enabled":true,"variant":{"name":"disabled","enabled":false,"feature_enabled":true},"impressionData":false},{"name":"mintql","enabled":true,"variant":{"name":"disabled","enabled":false,"feature_enabled":true},"impressionData":false},{"name":"page-level-analytics","enabled":true,"variant":{"name":"disabled","enabled":false,"feature_enabled":true},"impressionData":false},{"name":"teamspace","enabled":true,"variant":{"name":"disabled","enabled":false,"feature_enabled":true},"impressionData":false},{"name":"editor-version-history-v2","enabled":true,"variant":{"name":"disabled","enabled":false,"feature_enabled":true},"impressionData":false},{"name":"editor-nav-generations","enabled":true,"variant":{"name":"disabled","enabled":false,"feature_enabled":true},"impressionData":false},{"name":"workspace-projects","enabled":true,"variant":{"name":"disabled","enabled":false,"feature_enabled":true},"impressionData":false},{"name":"assistant-v5","enabled":true,"variant":{"name":"disabled","enabled":false,"feature_enabled":true},"impressionData":false},{"name":"byok-sep-25","enabled":true,"variant":{"name":"disabled","enabled":false,"feature_enabled":true},"impressionData":false},{"name":"revalidation-jwt","enabled":true,"variant":{"name":"disabled","enabled":false,"feature_enabled":true},"impressionData":false},{"name":"editor-agent-model-picker","enabled":true,"variant":{"name":"disabled","enabled":false,"feature_enabled":true},"impressionData":false},{"name":"client-snapshot-docs-config","enabled":true,"variant":{"name":"disabled","enabled":false,"feature_enabled":true},"impressionData":false},{"name":"hobby-abuse-scan","enabled":true,"variant":{"name":"disabled","enabled":false,"feature_enabled":true},"impressionData":false}],"isAtlas":false,"googleFontsInlined":true},"customCss":[],"page":{"pagePath":"quotes/create-a-quote","slug":"/quotes/create-a-quote","pageMetadata":{"title":"Create a quote","description":"Start a new quote, fill in the customer and site, add line items from your library, and send it to the customer.","href":"/quotes/create-a-quote"},"description":{"compiledSource":"\"use strict\";\nconst {jsx: _jsx} = arguments[0];\nconst {useMDXComponents: _provideComponents} = arguments[0];\nfunction _createMdxContent(props) {\n const _components = {\n p: \"p\",\n ..._provideComponents(),\n ...props.components\n };\n return _jsx(_components.p, {\n children: \"Start a new quote, fill in the customer and site, add line items from your library, and send it to the customer.\"\n });\n}\nfunction MDXContent(props = {}) {\n const {wrapper: MDXLayout} = {\n ..._provideComponents(),\n ...props.components\n };\n return MDXLayout ? _jsx(MDXLayout, {\n ...props,\n children: _jsx(_createMdxContent, {\n ...props\n })\n }) : _createMdxContent(props);\n}\nreturn {\n default: MDXContent\n};\n","frontmatter":{},"scope":{}},"pageType":"default","mdx":{"mdxSource":{"compiledSource":"\"use strict\";const{Fragment:_Fragment,jsx:_jsx,jsxs:_jsxs}=arguments[0];const{useMDXComponents:_provideComponents}=arguments[0];function _createMdxContent(props){const _components={em:`em`,li:`li`,p:`p`,strong:`strong`,ul:`ul`,..._provideComponents(),...props.components},{Frame,Heading,Note,OptimizedImage,Step,Steps}=_components;if(!Frame)_missingMdxReference(`Frame`,true);if(!Heading)_missingMdxReference(`Heading`,true);if(!Note)_missingMdxReference(`Note`,true);if(!OptimizedImage)_missingMdxReference(`OptimizedImage`,true);if(!Step)_missingMdxReference(`Step`,true);if(!Steps)_missingMdxReference(`Steps`,true);return _jsxs(_Fragment,{children:[_jsx(_components.p,{children:`A quote is where everything in Conficient starts. Once the customer accepts it, you turn it into a project and claim against it. This guide builds a quote from scratch and sends it.`}),`\n`,_jsxs(_components.p,{children:[_jsx(_components.strong,{children:`Who can do this:`}),` anyone whose role includes `,_jsx(_components.em,{children:`Edit quotes`}),`. Out of the box that is the Owner and Project Manager roles. Site Supervisors and Viewers can open a quote, but they see `,_jsx(_components.em,{children:`Read-only (your role can’t edit quotes)`}),` under its title and every field is locked.`]}),`\n`,_jsxs(Steps,{children:[_jsxs(Step,{title:`Open Quotes and press New quote`,children:[_jsxs(_components.p,{children:[`Choose `,_jsx(_components.strong,{children:`Quotes`}),` in the sidebar. The list shows every quote with its status and total, and the tabs above the table filter by status. Press `,_jsx(_components.strong,{children:`New quote`}),` at the top right. The `,_jsx(_components.strong,{children:`New quote`}),` button at the top of the sidebar does the same from any page.`]}),_jsx(Frame,{caption:`The Quotes list. New quote is at the top right.`,children:_jsx(OptimizedImage,{src:`https://mintcdn.com/conficient/u15AY9Pv4fMreuyc/images/quotes/create-a-quote/01-quotes-list-new-quote.png?fit=max\u0026auto=format\u0026n=u15AY9Pv4fMreuyc\u0026q=85\u0026s=394ceb574b1b51db4b0232c348e3eb26`,alt:`The Quotes list, with the New quote button outlined at the top right`,\"data-og-width\":`2880`,width:`2880`,\"data-og-height\":`1800`,height:`1800`,\"data-path\":`images/quotes/create-a-quote/01-quotes-list-new-quote.png`,\"data-optimize\":`true`,\"data-opv\":`3`,srcset:`https://mintcdn.com/conficient/u15AY9Pv4fMreuyc/images/quotes/create-a-quote/01-quotes-list-new-quote.png?w=280\u0026fit=max\u0026auto=format\u0026n=u15AY9Pv4fMreuyc\u0026q=85\u0026s=f3d0683838579f1d77b7c465507eb0b8 280w, https://mintcdn.com/conficient/u15AY9Pv4fMreuyc/images/quotes/create-a-quote/01-quotes-list-new-quote.png?w=560\u0026fit=max\u0026auto=format\u0026n=u15AY9Pv4fMreuyc\u0026q=85\u0026s=3b4e9f03f39b2299efc304924ffcb418 560w, https://mintcdn.com/conficient/u15AY9Pv4fMreuyc/images/quotes/create-a-quote/01-quotes-list-new-quote.png?w=840\u0026fit=max\u0026auto=format\u0026n=u15AY9Pv4fMreuyc\u0026q=85\u0026s=943cf7d354ca54832bd92dd38f2e0888 840w, https://mintcdn.com/conficient/u15AY9Pv4fMreuyc/images/quotes/create-a-quote/01-quotes-list-new-quote.png?w=1100\u0026fit=max\u0026auto=format\u0026n=u15AY9Pv4fMreuyc\u0026q=85\u0026s=c0c9cec6ffa7d0c95560365ebe5022e3 1100w, https://mintcdn.com/conficient/u15AY9Pv4fMreuyc/images/quotes/create-a-quote/01-quotes-list-new-quote.png?w=1650\u0026fit=max\u0026auto=format\u0026n=u15AY9Pv4fMreuyc\u0026q=85\u0026s=da6aeb5239c41459c4a59efd95f77dbe 1650w, https://mintcdn.com/conficient/u15AY9Pv4fMreuyc/images/quotes/create-a-quote/01-quotes-list-new-quote.png?w=2500\u0026fit=max\u0026auto=format\u0026n=u15AY9Pv4fMreuyc\u0026q=85\u0026s=7ee3b7b887c1f302fae1d8a177d7dc29 2500w`})})]}),_jsxs(Step,{title:`A new draft opens`,children:[_jsxs(_components.p,{children:[`Conficient creates the quote straight away, gives it the next number and opens it in the editor with the status `,_jsx(_components.strong,{children:`Draft`}),`. There is no Save button. The editor saves by itself a moment after every change, and the words under the title say when it last saved.`]}),_jsx(Frame,{caption:`A new draft, numbered and ready to fill in.`,children:_jsx(OptimizedImage,{src:`https://mintcdn.com/conficient/u15AY9Pv4fMreuyc/images/quotes/create-a-quote/02-new-draft.png?fit=max\u0026auto=format\u0026n=u15AY9Pv4fMreuyc\u0026q=85\u0026s=c98ee3d1cdd525afdb670df08098aea1`,alt:`The quote editor showing a new, empty draft quote`,\"data-og-width\":`2880`,width:`2880`,\"data-og-height\":`1800`,height:`1800`,\"data-path\":`images/quotes/create-a-quote/02-new-draft.png`,\"data-optimize\":`true`,\"data-opv\":`3`,srcset:`https://mintcdn.com/conficient/u15AY9Pv4fMreuyc/images/quotes/create-a-quote/02-new-draft.png?w=280\u0026fit=max\u0026auto=format\u0026n=u15AY9Pv4fMreuyc\u0026q=85\u0026s=9079c3890404424e4b0fd6d68554c11d 280w, https://mintcdn.com/conficient/u15AY9Pv4fMreuyc/images/quotes/create-a-quote/02-new-draft.png?w=560\u0026fit=max\u0026auto=format\u0026n=u15AY9Pv4fMreuyc\u0026q=85\u0026s=b89b20c61354f71e7f1941b24d0f731d 560w, https://mintcdn.com/conficient/u15AY9Pv4fMreuyc/images/quotes/create-a-quote/02-new-draft.png?w=840\u0026fit=max\u0026auto=format\u0026n=u15AY9Pv4fMreuyc\u0026q=85\u0026s=cb0b1332af201e46335e622db2817976 840w, https://mintcdn.com/conficient/u15AY9Pv4fMreuyc/images/quotes/create-a-quote/02-new-draft.png?w=1100\u0026fit=max\u0026auto=format\u0026n=u15AY9Pv4fMreuyc\u0026q=85\u0026s=3958757b35d0d4bc4ff350b99b30441f 1100w, https://mintcdn.com/conficient/u15AY9Pv4fMreuyc/images/quotes/create-a-quote/02-new-draft.png?w=1650\u0026fit=max\u0026auto=format\u0026n=u15AY9Pv4fMreuyc\u0026q=85\u0026s=a85d77654245540e4b6a9ce04373b9a1 1650w, https://mintcdn.com/conficient/u15AY9Pv4fMreuyc/images/quotes/create-a-quote/02-new-draft.png?w=2500\u0026fit=max\u0026auto=format\u0026n=u15AY9Pv4fMreuyc\u0026q=85\u0026s=fce5baeec36d2b06a1957dd23dc325f3 2500w`})})]}),_jsxs(Step,{title:`Name the quote`,children:[_jsxs(_components.p,{children:[`Click the words `,_jsx(_components.em,{children:`Untitled quote`}),` beside the number and type a name the customer will recognise, usually the site and the job. The name prints on the quote and shows in the Quotes list.`]}),_jsx(Frame,{children:_jsx(OptimizedImage,{src:`https://mintcdn.com/conficient/u15AY9Pv4fMreuyc/images/quotes/create-a-quote/03-quote-name.png?fit=max\u0026auto=format\u0026n=u15AY9Pv4fMreuyc\u0026q=85\u0026s=e2841525dd21719fea3eff98b4c00279`,alt:`The quote's title row with the name field outlined`,\"data-og-width\":`2352`,width:`2352`,\"data-og-height\":`226`,height:`226`,\"data-path\":`images/quotes/create-a-quote/03-quote-name.png`,\"data-optimize\":`true`,\"data-opv\":`3`,srcset:`https://mintcdn.com/conficient/u15AY9Pv4fMreuyc/images/quotes/create-a-quote/03-quote-name.png?w=280\u0026fit=max\u0026auto=format\u0026n=u15AY9Pv4fMreuyc\u0026q=85\u0026s=a4750f065a2e2499849f631af481612b 280w, https://mintcdn.com/conficient/u15AY9Pv4fMreuyc/images/quotes/create-a-quote/03-quote-name.png?w=560\u0026fit=max\u0026auto=format\u0026n=u15AY9Pv4fMreuyc\u0026q=85\u0026s=1921d31e63e9b337c96fa49877900a4d 560w, https://mintcdn.com/conficient/u15AY9Pv4fMreuyc/images/quotes/create-a-quote/03-quote-name.png?w=840\u0026fit=max\u0026auto=format\u0026n=u15AY9Pv4fMreuyc\u0026q=85\u0026s=b4f5f5a0065d994a567baea432cea434 840w, https://mintcdn.com/conficient/u15AY9Pv4fMreuyc/images/quotes/create-a-quote/03-quote-name.png?w=1100\u0026fit=max\u0026auto=format\u0026n=u15AY9Pv4fMreuyc\u0026q=85\u0026s=7b77cf6d9c6ec65c20eb8bc206c37d25 1100w, https://mintcdn.com/conficient/u15AY9Pv4fMreuyc/images/quotes/create-a-quote/03-quote-name.png?w=1650\u0026fit=max\u0026auto=format\u0026n=u15AY9Pv4fMreuyc\u0026q=85\u0026s=6d5d60cacf9f1fad21edf8a2ad13c58f 1650w, https://mintcdn.com/conficient/u15AY9Pv4fMreuyc/images/quotes/create-a-quote/03-quote-name.png?w=2500\u0026fit=max\u0026auto=format\u0026n=u15AY9Pv4fMreuyc\u0026q=85\u0026s=fc8a822c6aa24c028bb8f406d26337bc 2500w`})})]}),_jsxs(Step,{title:`Fill in the customer, site and dates`,children:[_jsx(_components.p,{children:`In the details card:`}),_jsxs(_components.ul,{children:[`\n`,_jsxs(_components.li,{children:[_jsx(_components.strong,{children:`Customer`}),`: pick one of your customers. If your role can manage customers (out of the box, the Owner), `,_jsx(_components.em,{children:`+ Create new customer…`}),` at the end of the list adds one without leaving the quote.`]}),`\n`,_jsxs(_components.li,{children:[_jsx(_components.strong,{children:`Site`}),` and `,_jsx(_components.strong,{children:`Site contact`}),`: only that customer’s sites and contacts are listed. They can be created in place the same way.`]}),`\n`,_jsxs(_components.li,{children:[_jsx(_components.strong,{children:`Issue date`}),` and `,_jsx(_components.strong,{children:`Valid until`}),`: the dates printed on the quote. Once a sent quote’s Valid until date has passed, the Quotes list marks it `,_jsx(_components.em,{children:`expired`}),`, and it counts down the last 14 days before that.`]}),`\n`,_jsxs(_components.li,{children:[_jsx(_components.strong,{children:`Customer ref`}),`: the customer’s own order or reference number, if they gave you one. It prints on the quote.`]}),`\n`]}),_jsx(Frame,{caption:`The details card, with the Customer field outlined.`,children:_jsx(OptimizedImage,{src:`https://mintcdn.com/conficient/u15AY9Pv4fMreuyc/images/quotes/create-a-quote/04-client-details.png?fit=max\u0026auto=format\u0026n=u15AY9Pv4fMreuyc\u0026q=85\u0026s=faebe4b0cec0e6add71620c19522ff22`,alt:`The quote's details card with customer, site, contact, dates and reference filled in`,\"data-og-width\":`2284`,width:`2284`,\"data-og-height\":`384`,height:`384`,\"data-path\":`images/quotes/create-a-quote/04-client-details.png`,\"data-optimize\":`true`,\"data-opv\":`3`,srcset:`https://mintcdn.com/conficient/u15AY9Pv4fMreuyc/images/quotes/create-a-quote/04-client-details.png?w=280\u0026fit=max\u0026auto=format\u0026n=u15AY9Pv4fMreuyc\u0026q=85\u0026s=8cb7652fe36d949900f14462e40d3cd5 280w, https://mintcdn.com/conficient/u15AY9Pv4fMreuyc/images/quotes/create-a-quote/04-client-details.png?w=560\u0026fit=max\u0026auto=format\u0026n=u15AY9Pv4fMreuyc\u0026q=85\u0026s=5956968196b3c360aef335a26e8efbd9 560w, https://mintcdn.com/conficient/u15AY9Pv4fMreuyc/images/quotes/create-a-quote/04-client-details.png?w=840\u0026fit=max\u0026auto=format\u0026n=u15AY9Pv4fMreuyc\u0026q=85\u0026s=79d06756d7ab8c22601497dae7101217 840w, https://mintcdn.com/conficient/u15AY9Pv4fMreuyc/images/quotes/create-a-quote/04-client-details.png?w=1100\u0026fit=max\u0026auto=format\u0026n=u15AY9Pv4fMreuyc\u0026q=85\u0026s=ac41afc319f290e2c72b4495d8b9323e 1100w, https://mintcdn.com/conficient/u15AY9Pv4fMreuyc/images/quotes/create-a-quote/04-client-details.png?w=1650\u0026fit=max\u0026auto=format\u0026n=u15AY9Pv4fMreuyc\u0026q=85\u0026s=bed8d17a526695f3cfaf7d9137d736df 1650w, https://mintcdn.com/conficient/u15AY9Pv4fMreuyc/images/quotes/create-a-quote/04-client-details.png?w=2500\u0026fit=max\u0026auto=format\u0026n=u15AY9Pv4fMreuyc\u0026q=85\u0026s=b5cb9f7830c770ef3fa090e93530a5c0 2500w`})})]}),_jsxs(Step,{title:`Write the overview, or insert a template`,children:[_jsxs(_components.p,{children:[`The `,_jsx(_components.strong,{children:`Overview`}),` prints above the line items. Type it, or press `,_jsx(_components.strong,{children:`Use a template`}),` to read a saved wording first and then `,_jsx(_components.strong,{children:`Insert`}),` it. If you have already written something, the buttons become `,_jsx(_components.strong,{children:`Replace`}),` and `,_jsx(_components.strong,{children:`Add to what’s there`}),`. `,_jsx(_components.strong,{children:`Save as template`}),` keeps your own wording for next time.`]}),_jsx(Frame,{caption:`Read a template before you put it in.`,children:_jsx(OptimizedImage,{src:`https://mintcdn.com/conficient/u15AY9Pv4fMreuyc/images/quotes/create-a-quote/05-overview-template.png?fit=max\u0026auto=format\u0026n=u15AY9Pv4fMreuyc\u0026q=85\u0026s=4e6cfc1d7f43882ebf370e553928e3c8`,alt:`The Use a template dialog showing a saved overview wording with an Insert button`,\"data-og-width\":`2880`,width:`2880`,\"data-og-height\":`1800`,height:`1800`,\"data-path\":`images/quotes/create-a-quote/05-overview-template.png`,\"data-optimize\":`true`,\"data-opv\":`3`,srcset:`https://mintcdn.com/conficient/u15AY9Pv4fMreuyc/images/quotes/create-a-quote/05-overview-template.png?w=280\u0026fit=max\u0026auto=format\u0026n=u15AY9Pv4fMreuyc\u0026q=85\u0026s=c4382b6c0083c7c08ac42867be037018 280w, https://mintcdn.com/conficient/u15AY9Pv4fMreuyc/images/quotes/create-a-quote/05-overview-template.png?w=560\u0026fit=max\u0026auto=format\u0026n=u15AY9Pv4fMreuyc\u0026q=85\u0026s=f993a30b230dfaa3086d56b11c6996b6 560w, https://mintcdn.com/conficient/u15AY9Pv4fMreuyc/images/quotes/create-a-quote/05-overview-template.png?w=840\u0026fit=max\u0026auto=format\u0026n=u15AY9Pv4fMreuyc\u0026q=85\u0026s=bd0e03542a42c946f6a9fa5ebca1db00 840w, https://mintcdn.com/conficient/u15AY9Pv4fMreuyc/images/quotes/create-a-quote/05-overview-template.png?w=1100\u0026fit=max\u0026auto=format\u0026n=u15AY9Pv4fMreuyc\u0026q=85\u0026s=6d7cdc191930bf8440e1c7f8ac78417b 1100w, https://mintcdn.com/conficient/u15AY9Pv4fMreuyc/images/quotes/create-a-quote/05-overview-template.png?w=1650\u0026fit=max\u0026auto=format\u0026n=u15AY9Pv4fMreuyc\u0026q=85\u0026s=76ca1d888eb596687ace94b4023cb467 1650w, https://mintcdn.com/conficient/u15AY9Pv4fMreuyc/images/quotes/create-a-quote/05-overview-template.png?w=2500\u0026fit=max\u0026auto=format\u0026n=u15AY9Pv4fMreuyc\u0026q=85\u0026s=2552e0af693c6f2666db3b9ce73d6746 2500w`})})]}),_jsxs(Step,{title:`Add line items`,children:[_jsxs(_components.p,{children:[`The line items grid works like a spreadsheet: click a cell and type, press Enter to finish, and use Tab or the arrow keys to move. Press `,_jsx(_components.strong,{children:`Line item`}),` under the grid to add a row.`]}),_jsxs(_components.p,{children:[`The other buttons in that bar: `,_jsx(_components.strong,{children:`Add section`}),` splits a long quote into named sections, each with its own subtotal; `,_jsx(_components.strong,{children:`Browse library`}),` inserts several library items at once; `,_jsx(_components.strong,{children:`Import CSV`}),` brings rows in from a spreadsheet.`]}),_jsx(Frame,{caption:`An empty grid. Line item adds a row.`,children:_jsx(OptimizedImage,{src:`https://mintcdn.com/conficient/u15AY9Pv4fMreuyc/images/quotes/create-a-quote/06-line-items-add-bar.png?fit=max\u0026auto=format\u0026n=u15AY9Pv4fMreuyc\u0026q=85\u0026s=d63395362dc9cf08b2354eec153171b6`,alt:`The Line items card before any rows, with the Line item button outlined`,\"data-og-width\":`2304`,width:`2304`,\"data-og-height\":`528`,height:`528`,\"data-path\":`images/quotes/create-a-quote/06-line-items-add-bar.png`,\"data-optimize\":`true`,\"data-opv\":`3`,srcset:`https://mintcdn.com/conficient/u15AY9Pv4fMreuyc/images/quotes/create-a-quote/06-line-items-add-bar.png?w=280\u0026fit=max\u0026auto=format\u0026n=u15AY9Pv4fMreuyc\u0026q=85\u0026s=200517ac1151fdc66543ab86db223253 280w, https://mintcdn.com/conficient/u15AY9Pv4fMreuyc/images/quotes/create-a-quote/06-line-items-add-bar.png?w=560\u0026fit=max\u0026auto=format\u0026n=u15AY9Pv4fMreuyc\u0026q=85\u0026s=99be8effd95a24fbfb3415ccb2df5ab1 560w, https://mintcdn.com/conficient/u15AY9Pv4fMreuyc/images/quotes/create-a-quote/06-line-items-add-bar.png?w=840\u0026fit=max\u0026auto=format\u0026n=u15AY9Pv4fMreuyc\u0026q=85\u0026s=b5578c572f6e6920ccce6b8c508a6298 840w, https://mintcdn.com/conficient/u15AY9Pv4fMreuyc/images/quotes/create-a-quote/06-line-items-add-bar.png?w=1100\u0026fit=max\u0026auto=format\u0026n=u15AY9Pv4fMreuyc\u0026q=85\u0026s=391c795910acd1de97393c5eb88a68c8 1100w, https://mintcdn.com/conficient/u15AY9Pv4fMreuyc/images/quotes/create-a-quote/06-line-items-add-bar.png?w=1650\u0026fit=max\u0026auto=format\u0026n=u15AY9Pv4fMreuyc\u0026q=85\u0026s=5e35388795af5d7b1c75ae744fa147d2 1650w, https://mintcdn.com/conficient/u15AY9Pv4fMreuyc/images/quotes/create-a-quote/06-line-items-add-bar.png?w=2500\u0026fit=max\u0026auto=format\u0026n=u15AY9Pv4fMreuyc\u0026q=85\u0026s=037abb0f0de882020161dd1d51eb9331 2500w`})})]}),_jsxs(Step,{title:`Pick items from your library`,children:[_jsxs(_components.p,{children:[`Click the new row’s `,_jsx(_components.strong,{children:`Code`}),` cell and start typing a code or a few words of the description. Matching items from your line-item library appear underneath with their unit and rate. Highlight one with the arrow keys and press Enter: the code, description, unit and rate fill in, and the selection moves to `,_jsx(_components.strong,{children:`Qty`}),` so you can type the quantity straight away.`]}),_jsx(Frame,{caption:`Typing a code offers the matching library items.`,children:_jsx(OptimizedImage,{src:`https://mintcdn.com/conficient/u15AY9Pv4fMreuyc/images/quotes/create-a-quote/07-library-suggestions.png?fit=max\u0026auto=format\u0026n=u15AY9Pv4fMreuyc\u0026q=85\u0026s=6d878500992dc23be2f9939aa6701eec`,alt:`The line items grid with a list of matching library items under the Code cell`,\"data-og-width\":`2304`,width:`2304`,\"data-og-height\":`508`,height:`508`,\"data-path\":`images/quotes/create-a-quote/07-library-suggestions.png`,\"data-optimize\":`true`,\"data-opv\":`3`,srcset:`https://mintcdn.com/conficient/u15AY9Pv4fMreuyc/images/quotes/create-a-quote/07-library-suggestions.png?w=280\u0026fit=max\u0026auto=format\u0026n=u15AY9Pv4fMreuyc\u0026q=85\u0026s=2a9ed05d9c1ec555acf0caa5729c06f1 280w, https://mintcdn.com/conficient/u15AY9Pv4fMreuyc/images/quotes/create-a-quote/07-library-suggestions.png?w=560\u0026fit=max\u0026auto=format\u0026n=u15AY9Pv4fMreuyc\u0026q=85\u0026s=87913ddafca3745fa6edc666242a7317 560w, https://mintcdn.com/conficient/u15AY9Pv4fMreuyc/images/quotes/create-a-quote/07-library-suggestions.png?w=840\u0026fit=max\u0026auto=format\u0026n=u15AY9Pv4fMreuyc\u0026q=85\u0026s=9414da2263f58a04da9534d0764c6c61 840w, https://mintcdn.com/conficient/u15AY9Pv4fMreuyc/images/quotes/create-a-quote/07-library-suggestions.png?w=1100\u0026fit=max\u0026auto=format\u0026n=u15AY9Pv4fMreuyc\u0026q=85\u0026s=fa0e7a80b92900fb06a43b844484a2a7 1100w, https://mintcdn.com/conficient/u15AY9Pv4fMreuyc/images/quotes/create-a-quote/07-library-suggestions.png?w=1650\u0026fit=max\u0026auto=format\u0026n=u15AY9Pv4fMreuyc\u0026q=85\u0026s=65b258999c0e100fb5013dae7ca26d9f 1650w, https://mintcdn.com/conficient/u15AY9Pv4fMreuyc/images/quotes/create-a-quote/07-library-suggestions.png?w=2500\u0026fit=max\u0026auto=format\u0026n=u15AY9Pv4fMreuyc\u0026q=85\u0026s=3b4b7deafc9e0c8505ad5bfddbd8633a 2500w`})})]}),_jsxs(Step,{title:`Type a one-off line by hand`,children:[_jsxs(_components.p,{children:[`A line that is not in your library is typed cell by cell: description, quantity, unit and unit rate. The row’s amount and the totals at the bottom update each time you finish a cell. If you will use the line again, select the row and press `,_jsx(_components.strong,{children:`Save row 4 to library`}),` at the top right of the Line items card (the number follows the selected row). Only roles that may manage the library see that button; out of the box, the Owner.`]}),_jsx(Frame,{caption:`Three library lines and one typed by hand.`,children:_jsx(OptimizedImage,{src:`https://mintcdn.com/conficient/u15AY9Pv4fMreuyc/images/quotes/create-a-quote/08-line-items-filled.png?fit=max\u0026auto=format\u0026n=u15AY9Pv4fMreuyc\u0026q=85\u0026s=f0078b475867bd3919449cc7c33655e5`,alt:`The line items grid with four rows and their amounts`,\"data-og-width\":`2304`,width:`2304`,\"data-og-height\":`626`,height:`626`,\"data-path\":`images/quotes/create-a-quote/08-line-items-filled.png`,\"data-optimize\":`true`,\"data-opv\":`3`,srcset:`https://mintcdn.com/conficient/u15AY9Pv4fMreuyc/images/quotes/create-a-quote/08-line-items-filled.png?w=280\u0026fit=max\u0026auto=format\u0026n=u15AY9Pv4fMreuyc\u0026q=85\u0026s=4aebc02618e836a543277033b60ce542 280w, https://mintcdn.com/conficient/u15AY9Pv4fMreuyc/images/quotes/create-a-quote/08-line-items-filled.png?w=560\u0026fit=max\u0026auto=format\u0026n=u15AY9Pv4fMreuyc\u0026q=85\u0026s=1ed1973d92465646d16aa0333e93ee4e 560w, https://mintcdn.com/conficient/u15AY9Pv4fMreuyc/images/quotes/create-a-quote/08-line-items-filled.png?w=840\u0026fit=max\u0026auto=format\u0026n=u15AY9Pv4fMreuyc\u0026q=85\u0026s=42820b5b67980cd19bc1de72dc80c409 840w, https://mintcdn.com/conficient/u15AY9Pv4fMreuyc/images/quotes/create-a-quote/08-line-items-filled.png?w=1100\u0026fit=max\u0026auto=format\u0026n=u15AY9Pv4fMreuyc\u0026q=85\u0026s=8bfc709356d451a26dae68e87fd06cf2 1100w, https://mintcdn.com/conficient/u15AY9Pv4fMreuyc/images/quotes/create-a-quote/08-line-items-filled.png?w=1650\u0026fit=max\u0026auto=format\u0026n=u15AY9Pv4fMreuyc\u0026q=85\u0026s=eddf7efb3577d7e825a79985cf1b10d1 1650w, https://mintcdn.com/conficient/u15AY9Pv4fMreuyc/images/quotes/create-a-quote/08-line-items-filled.png?w=2500\u0026fit=max\u0026auto=format\u0026n=u15AY9Pv4fMreuyc\u0026q=85\u0026s=d154cdc3b6f8df66a02ea2c70571de6e 2500w`})})]}),_jsxs(Step,{title:`Check the totals`,children:[_jsxs(_components.p,{children:[`The bar at the bottom of the screen always shows the subtotal, the GST and the total including GST, with the quote’s actions beside them. `,_jsx(_components.strong,{children:`Export PDF`}),` opens the printed quote in a new tab, with your browser’s print window ready; choose `,_jsx(_components.em,{children:`Save as PDF`}),` there to keep a file.`]}),_jsx(Frame,{caption:`The totals bar, with Send to customer outlined.`,children:_jsx(OptimizedImage,{src:`https://mintcdn.com/conficient/u15AY9Pv4fMreuyc/images/quotes/create-a-quote/09-totals-and-send.png?fit=max\u0026auto=format\u0026n=u15AY9Pv4fMreuyc\u0026q=85\u0026s=e0ad6295681d2c389cf69f83113873b0`,alt:`The totals bar showing subtotal, GST and total, with Export PDF, Mark accepted and Send to customer buttons`,\"data-og-width\":`2400`,width:`2400`,\"data-og-height\":`142`,height:`142`,\"data-path\":`images/quotes/create-a-quote/09-totals-and-send.png`,\"data-optimize\":`true`,\"data-opv\":`3`,srcset:`https://mintcdn.com/conficient/u15AY9Pv4fMreuyc/images/quotes/create-a-quote/09-totals-and-send.png?w=280\u0026fit=max\u0026auto=format\u0026n=u15AY9Pv4fMreuyc\u0026q=85\u0026s=10550b7b1015f97851d9372f91dcfe5a 280w, https://mintcdn.com/conficient/u15AY9Pv4fMreuyc/images/quotes/create-a-quote/09-totals-and-send.png?w=560\u0026fit=max\u0026auto=format\u0026n=u15AY9Pv4fMreuyc\u0026q=85\u0026s=cbbeecf36fb928de06a16e0b70d47229 560w, https://mintcdn.com/conficient/u15AY9Pv4fMreuyc/images/quotes/create-a-quote/09-totals-and-send.png?w=840\u0026fit=max\u0026auto=format\u0026n=u15AY9Pv4fMreuyc\u0026q=85\u0026s=608ffa67713a0877193e039c5dfd3960 840w, https://mintcdn.com/conficient/u15AY9Pv4fMreuyc/images/quotes/create-a-quote/09-totals-and-send.png?w=1100\u0026fit=max\u0026auto=format\u0026n=u15AY9Pv4fMreuyc\u0026q=85\u0026s=16d001960aa42ccd576bea740b3df09b 1100w, https://mintcdn.com/conficient/u15AY9Pv4fMreuyc/images/quotes/create-a-quote/09-totals-and-send.png?w=1650\u0026fit=max\u0026auto=format\u0026n=u15AY9Pv4fMreuyc\u0026q=85\u0026s=12e5e6182d92b8e75c1fad40a75eed8d 1650w, https://mintcdn.com/conficient/u15AY9Pv4fMreuyc/images/quotes/create-a-quote/09-totals-and-send.png?w=2500\u0026fit=max\u0026auto=format\u0026n=u15AY9Pv4fMreuyc\u0026q=85\u0026s=cc47d62cad31f4ba5018310de895a9b0 2500w`})})]}),_jsxs(Step,{title:`Send it to the customer`,children:[_jsxs(_components.p,{children:[`Press `,_jsx(_components.strong,{children:`Send to customer`}),`, choose who it is going to, and press `,_jsx(_components.strong,{children:`Confirm send`}),`. The customer’s contacts who have an email address are offered, or you can type an address.`]}),_jsx(Note,{children:`Conficient records who the quote went to; it does not email it yet. Export the PDF and send it the way you normally would.`}),_jsx(Frame,{children:_jsx(OptimizedImage,{src:`https://mintcdn.com/conficient/u15AY9Pv4fMreuyc/images/quotes/create-a-quote/10-send-dialog.png?fit=max\u0026auto=format\u0026n=u15AY9Pv4fMreuyc\u0026q=85\u0026s=eac2d1018c782610b545bb20111f6f80`,alt:`The Send quote dialog with a recipient chosen and the Confirm send button`,\"data-og-width\":`2880`,width:`2880`,\"data-og-height\":`1800`,height:`1800`,\"data-path\":`images/quotes/create-a-quote/10-send-dialog.png`,\"data-optimize\":`true`,\"data-opv\":`3`,srcset:`https://mintcdn.com/conficient/u15AY9Pv4fMreuyc/images/quotes/create-a-quote/10-send-dialog.png?w=280\u0026fit=max\u0026auto=format\u0026n=u15AY9Pv4fMreuyc\u0026q=85\u0026s=49de6c7e6e8c8bb85627a8a2d823fde4 280w, https://mintcdn.com/conficient/u15AY9Pv4fMreuyc/images/quotes/create-a-quote/10-send-dialog.png?w=560\u0026fit=max\u0026auto=format\u0026n=u15AY9Pv4fMreuyc\u0026q=85\u0026s=ea84c292dea56fce10a090266d4016b9 560w, https://mintcdn.com/conficient/u15AY9Pv4fMreuyc/images/quotes/create-a-quote/10-send-dialog.png?w=840\u0026fit=max\u0026auto=format\u0026n=u15AY9Pv4fMreuyc\u0026q=85\u0026s=3fcaf86b530755037a424335923abeaa 840w, https://mintcdn.com/conficient/u15AY9Pv4fMreuyc/images/quotes/create-a-quote/10-send-dialog.png?w=1100\u0026fit=max\u0026auto=format\u0026n=u15AY9Pv4fMreuyc\u0026q=85\u0026s=0c2a72f15b4a460b3328c8054ccf052d 1100w, https://mintcdn.com/conficient/u15AY9Pv4fMreuyc/images/quotes/create-a-quote/10-send-dialog.png?w=1650\u0026fit=max\u0026auto=format\u0026n=u15AY9Pv4fMreuyc\u0026q=85\u0026s=e21b40ed0be7f56a2c110888b7938161 1650w, https://mintcdn.com/conficient/u15AY9Pv4fMreuyc/images/quotes/create-a-quote/10-send-dialog.png?w=2500\u0026fit=max\u0026auto=format\u0026n=u15AY9Pv4fMreuyc\u0026q=85\u0026s=5c11e8dbc13b6c1b6964e300885573cf 2500w`})})]}),_jsxs(Step,{title:`The quote is now Sent`,children:[_jsxs(_components.p,{children:[`The status badge beside the name changes to `,_jsx(_components.strong,{children:`Sent`}),`. Sent it by mistake? Press `,_jsx(_components.strong,{children:`Undo`}),` in the message at the bottom right within a few seconds and it goes back to Draft.`]}),_jsx(Frame,{caption:`Sent, with the Undo message still showing.`,children:_jsx(OptimizedImage,{src:`https://mintcdn.com/conficient/u15AY9Pv4fMreuyc/images/quotes/create-a-quote/11-quote-sent.png?fit=max\u0026auto=format\u0026n=u15AY9Pv4fMreuyc\u0026q=85\u0026s=23bd212a7abb33a51afa78028b8cb445`,alt:`The quote editor after sending: the Sent badge outlined beside the name, and an Undo message at the bottom right`,\"data-og-width\":`2880`,width:`2880`,\"data-og-height\":`1800`,height:`1800`,\"data-path\":`images/quotes/create-a-quote/11-quote-sent.png`,\"data-optimize\":`true`,\"data-opv\":`3`,srcset:`https://mintcdn.com/conficient/u15AY9Pv4fMreuyc/images/quotes/create-a-quote/11-quote-sent.png?w=280\u0026fit=max\u0026auto=format\u0026n=u15AY9Pv4fMreuyc\u0026q=85\u0026s=338df8f70fa3b3164c35f5404fd2cccf 280w, https://mintcdn.com/conficient/u15AY9Pv4fMreuyc/images/quotes/create-a-quote/11-quote-sent.png?w=560\u0026fit=max\u0026auto=format\u0026n=u15AY9Pv4fMreuyc\u0026q=85\u0026s=0627ba9197729727ee2485deeecd6504 560w, https://mintcdn.com/conficient/u15AY9Pv4fMreuyc/images/quotes/create-a-quote/11-quote-sent.png?w=840\u0026fit=max\u0026auto=format\u0026n=u15AY9Pv4fMreuyc\u0026q=85\u0026s=265ce310fac6be8715b2298c45342ae2 840w, https://mintcdn.com/conficient/u15AY9Pv4fMreuyc/images/quotes/create-a-quote/11-quote-sent.png?w=1100\u0026fit=max\u0026auto=format\u0026n=u15AY9Pv4fMreuyc\u0026q=85\u0026s=73c839237915c0b9fe3844f44b598852 1100w, https://mintcdn.com/conficient/u15AY9Pv4fMreuyc/images/quotes/create-a-quote/11-quote-sent.png?w=1650\u0026fit=max\u0026auto=format\u0026n=u15AY9Pv4fMreuyc\u0026q=85\u0026s=06052972064af3c5900ce0cd40375764 1650w, https://mintcdn.com/conficient/u15AY9Pv4fMreuyc/images/quotes/create-a-quote/11-quote-sent.png?w=2500\u0026fit=max\u0026auto=format\u0026n=u15AY9Pv4fMreuyc\u0026q=85\u0026s=eaad1427ec4388f5ec3a9a1dce3e6cf3 2500w`})}),_jsxs(_components.p,{children:[`Once the message has gone, the actions in the totals bar are `,_jsx(_components.strong,{children:`Mark rejected`}),` and `,_jsx(_components.strong,{children:`Mark accepted`}),`, for when the customer decides.`]}),_jsx(Frame,{caption:`A sent quote's actions.`,children:_jsx(OptimizedImage,{src:`https://mintcdn.com/conficient/u15AY9Pv4fMreuyc/images/quotes/create-a-quote/12-sent-actions.png?fit=max\u0026auto=format\u0026n=u15AY9Pv4fMreuyc\u0026q=85\u0026s=92a7e496f86d56704a92b4d35a2c66aa`,alt:`The totals bar of a sent quote with Export PDF, Mark rejected and Mark accepted buttons`,\"data-og-width\":`2400`,width:`2400`,\"data-og-height\":`142`,height:`142`,\"data-path\":`images/quotes/create-a-quote/12-sent-actions.png`,\"data-optimize\":`true`,\"data-opv\":`3`,srcset:`https://mintcdn.com/conficient/u15AY9Pv4fMreuyc/images/quotes/create-a-quote/12-sent-actions.png?w=280\u0026fit=max\u0026auto=format\u0026n=u15AY9Pv4fMreuyc\u0026q=85\u0026s=8dc74d137bb53750fb0b74a4fbfdbf49 280w, https://mintcdn.com/conficient/u15AY9Pv4fMreuyc/images/quotes/create-a-quote/12-sent-actions.png?w=560\u0026fit=max\u0026auto=format\u0026n=u15AY9Pv4fMreuyc\u0026q=85\u0026s=b80872d89b9cc02f9c13ac4d2e6cc28f 560w, https://mintcdn.com/conficient/u15AY9Pv4fMreuyc/images/quotes/create-a-quote/12-sent-actions.png?w=840\u0026fit=max\u0026auto=format\u0026n=u15AY9Pv4fMreuyc\u0026q=85\u0026s=dd641fa6680c6f55a586125ff7aebbe2 840w, https://mintcdn.com/conficient/u15AY9Pv4fMreuyc/images/quotes/create-a-quote/12-sent-actions.png?w=1100\u0026fit=max\u0026auto=format\u0026n=u15AY9Pv4fMreuyc\u0026q=85\u0026s=aa019468c149fa97aac0aeef8f03947b 1100w, https://mintcdn.com/conficient/u15AY9Pv4fMreuyc/images/quotes/create-a-quote/12-sent-actions.png?w=1650\u0026fit=max\u0026auto=format\u0026n=u15AY9Pv4fMreuyc\u0026q=85\u0026s=cc6718a44b1af9ac69a20820fa796052 1650w, https://mintcdn.com/conficient/u15AY9Pv4fMreuyc/images/quotes/create-a-quote/12-sent-actions.png?w=2500\u0026fit=max\u0026auto=format\u0026n=u15AY9Pv4fMreuyc\u0026q=85\u0026s=2c157ac897c92b0097a3670cb739f8d0 2500w`})})]}),_jsxs(Step,{title:`What the customer sees`,children:[_jsxs(_components.p,{children:[_jsx(_components.strong,{children:`Export PDF`}),` prints the quote on your letterhead, with the overview, the line items and totals, and any allowances, exclusions and terms you added.`]}),_jsx(Frame,{caption:`The printed quote.`,children:_jsx(OptimizedImage,{src:`https://mintcdn.com/conficient/u15AY9Pv4fMreuyc/images/quotes/create-a-quote/13-printed-quote.png?fit=max\u0026auto=format\u0026n=u15AY9Pv4fMreuyc\u0026q=85\u0026s=9947bf0508ad31d94d5050511a86b446`,alt:`The printed quote on the company letterhead`,\"data-og-width\":`1586`,width:`1586`,\"data-og-height\":`1856`,height:`1856`,\"data-path\":`images/quotes/create-a-quote/13-printed-quote.png`,\"data-optimize\":`true`,\"data-opv\":`3`,srcset:`https://mintcdn.com/conficient/u15AY9Pv4fMreuyc/images/quotes/create-a-quote/13-printed-quote.png?w=280\u0026fit=max\u0026auto=format\u0026n=u15AY9Pv4fMreuyc\u0026q=85\u0026s=5651e3836425d400349211530e4c6456 280w, https://mintcdn.com/conficient/u15AY9Pv4fMreuyc/images/quotes/create-a-quote/13-printed-quote.png?w=560\u0026fit=max\u0026auto=format\u0026n=u15AY9Pv4fMreuyc\u0026q=85\u0026s=3eeefe60a9fd40e5615c409616937562 560w, https://mintcdn.com/conficient/u15AY9Pv4fMreuyc/images/quotes/create-a-quote/13-printed-quote.png?w=840\u0026fit=max\u0026auto=format\u0026n=u15AY9Pv4fMreuyc\u0026q=85\u0026s=e7b87616d1e79f351f8a39317684d383 840w, https://mintcdn.com/conficient/u15AY9Pv4fMreuyc/images/quotes/create-a-quote/13-printed-quote.png?w=1100\u0026fit=max\u0026auto=format\u0026n=u15AY9Pv4fMreuyc\u0026q=85\u0026s=74e698290990feb988488984b407ce8a 1100w, https://mintcdn.com/conficient/u15AY9Pv4fMreuyc/images/quotes/create-a-quote/13-printed-quote.png?w=1650\u0026fit=max\u0026auto=format\u0026n=u15AY9Pv4fMreuyc\u0026q=85\u0026s=a83ee280175ca1f98926a168424f819b 1650w, https://mintcdn.com/conficient/u15AY9Pv4fMreuyc/images/quotes/create-a-quote/13-printed-quote.png?w=2500\u0026fit=max\u0026auto=format\u0026n=u15AY9Pv4fMreuyc\u0026q=85\u0026s=8983584d9401ddb0a03dc95855ce34b3 2500w`})})]})]}),`\n`,_jsx(Heading,{level:`2`,id:`good-to-know`,children:`Good to know`}),`\n`,_jsxs(_components.ul,{children:[`\n`,_jsxs(_components.li,{children:[_jsx(_components.strong,{children:`Allowances \u0026 exclusions`}),` and `,_jsx(_components.strong,{children:`Terms \u0026 conditions`}),` sit under the line items, with the same `,_jsx(_components.strong,{children:`Use a template`}),` and `,_jsx(_components.strong,{children:`Save as template`}),` buttons. Put your standard terms in once as a template and insert them on every quote.`]}),`\n`,_jsxs(_components.li,{children:[_jsx(_components.strong,{children:`Mark accepted`}),` works straight from Draft, for a quote the customer agreed to in person or by phone.`]}),`\n`,_jsxs(_components.li,{children:[_jsx(_components.strong,{children:`Duplicate`}),`, in the ”…” menu beside History, copies a quote into a new draft. Handy for repeat work.`]}),`\n`,_jsxs(_components.li,{children:[_jsx(_components.strong,{children:`Save version`}),`, in the same menu, keeps a restore point in the quote’s History. Autosaves do not, so save a version before a big rework.`]}),`\n`,_jsxs(_components.li,{children:[_jsx(_components.strong,{children:`Sections`}),` carry through to the project: budgets, claims and costs can be tracked section by section.`]}),`\n`]}),`\n`,_jsx(Heading,{level:`2`,id:`what’s-next`,children:`What’s next`}),`\n`,_jsxs(_components.p,{children:[`When the customer accepts, press `,_jsx(_components.strong,{children:`Mark accepted`}),` and then `,_jsx(_components.strong,{children:`Convert to project`}),`. The project’s contract value is the quote’s subtotal (ex GST), and the quote’s line items and sections become the project’s claim schedule, ready for the first progress claim.`]})]})}function MDXContent(props={}){const{wrapper:MDXLayout}={..._provideComponents(),...props.components};return MDXLayout?_jsx(MDXLayout,{...props,children:_jsx(_createMdxContent,{...props})}):_createMdxContent(props)}return{default:MDXContent};function _missingMdxReference(id,component){throw new Error(`Expected `+(component?`component`:`object`)+\" `\"+id+\"` to be defined: you likely forgot to import, pass, or provide it.\")}","frontmatter":{},"scope":{"config":{},"pageMetadata":{"title":"Create a quote","description":"Start a new quote, fill in the customer and site, add line items from your library, and send it to the customer.","href":"/quotes/create-a-quote"}}},"mdxSourceWithNoJs":null},"mdxExtracts":{"tableOfContents":[{"title":"Good to know","slug":"good-to-know","depth":2,"children":[]},{"title":"What’s next","slug":"what’s-next","depth":2,"children":[]}],"codeExamples":{}},"jsLinks":[],"subdomain":"conficient","siteName":"Conficient Help","title":"Create a quote - Conficient Help","navMaps":{"firstHrefInVersion":{},"firstHrefInLanguage":{}},"lastModified":"2026-10-17T05:38:25.444Z","originalFileLocation":"quotes/create-a-quote.mdx"},"headHtml":"\u003cmeta data-mint-head name=\"description\" content=\"Start a new quote, fill in the customer and site, add line items from your library, and send it to the customer.\">\u003cmeta data-mint-head name=\"application-name\" content=\"Conficient Help\">\u003cmeta data-mint-head name=\"generator\" content=\"Mintlify\">\u003clink data-mint-head rel=\"icon\" type=\"image/png\" sizes=\"192x192\" href=\"/mintlify-assets/_mintlify/favicons/conficient/BAIoj37tod1iPGEV/_generated/favicon/android-chrome-192x192.png\" media=\"(prefers-color-scheme: light)\">\u003clink data-mint-head rel=\"apple-touch-icon\" type=\"image/png\" sizes=\"180x180\" href=\"/mintlify-assets/_mintlify/favicons/conficient/BAIoj37tod1iPGEV/_generated/favicon/apple-touch-icon.png\">\u003clink data-mint-head rel=\"icon\" type=\"image/png\" sizes=\"16x16\" href=\"/mintlify-assets/_mintlify/favicons/conficient/BAIoj37tod1iPGEV/_generated/favicon/favicon-16x16.png\" media=\"(prefers-color-scheme: light)\">\u003clink data-mint-head rel=\"icon\" type=\"image/png\" sizes=\"32x32\" href=\"/mintlify-assets/_mintlify/favicons/conficient/BAIoj37tod1iPGEV/_generated/favicon/favicon-32x32.png\" media=\"(prefers-color-scheme: light)\">\u003clink data-mint-head rel=\"shortcut icon\" type=\"image/x-icon\" href=\"/mintlify-assets/_mintlify/favicons/conficient/BAIoj37tod1iPGEV/_generated/favicon/favicon.ico\" media=\"(prefers-color-scheme: light)\">\u003clink data-mint-head rel=\"icon\" type=\"image/png\" sizes=\"192x192\" href=\"/mintlify-assets/_mintlify/favicons/conficient/BAIoj37tod1iPGEV/_generated/favicon-dark/android-chrome-192x192.png\" media=\"(prefers-color-scheme: dark)\">\u003clink data-mint-head rel=\"icon\" type=\"image/png\" sizes=\"16x16\" href=\"/mintlify-assets/_mintlify/favicons/conficient/BAIoj37tod1iPGEV/_generated/favicon-dark/favicon-16x16.png\" media=\"(prefers-color-scheme: dark)\">\u003clink data-mint-head rel=\"icon\" type=\"image/png\" sizes=\"32x32\" href=\"/mintlify-assets/_mintlify/favicons/conficient/BAIoj37tod1iPGEV/_generated/favicon-dark/favicon-32x32.png\" media=\"(prefers-color-scheme: dark)\">\u003clink data-mint-head rel=\"shortcut icon\" type=\"image/x-icon\" href=\"/mintlify-assets/_mintlify/favicons/conficient/BAIoj37tod1iPGEV/_generated/favicon-dark/favicon.ico\" media=\"(prefers-color-scheme: dark)\">\u003cmeta data-mint-head property=\"og:title\" content=\"Create a quote - Conficient Help\">\u003cmeta data-mint-head property=\"og:description\" content=\"Start a new quote, fill in the customer and site, add line items from your library, and send it to the customer.\">\u003cmeta data-mint-head property=\"og:site_name\" content=\"Conficient Help\">\u003cmeta data-mint-head property=\"og:url\" content=\"https://help.conficient.io/quotes/create-a-quote\">\u003cmeta data-mint-head property=\"og:type\" content=\"website\">\u003cmeta data-mint-head name=\"twitter:card\" content=\"summary_large_image\">\u003cmeta data-mint-head name=\"twitter:title\" content=\"Create a quote - Conficient Help\">\u003cmeta data-mint-head name=\"twitter:description\" content=\"Start a new quote, fill in the customer and site, add line items from your library, and send it to the customer.\">\u003cmeta data-mint-head name=\"msapplication-config\" content=\"/mintlify-assets/_mintlify/favicons/conficient/BAIoj37tod1iPGEV/_generated/favicon/browserconfig.xml\">\u003cmeta data-mint-head name=\"apple-mobile-web-app-title\" content=\"Conficient Help\">\u003cmeta data-mint-head name=\"msapplication-TileColor\" content=\"#3850C7\">\u003clink data-mint-head rel=\"canonical\" href=\"https://help.conficient.io/quotes/create-a-quote\">\u003clink data-mint-head rel=\"alternate\" type=\"application/xml\" href=\"/sitemap.xml\">\u003clink data-mint-head rel=\"alternate\" type=\"text/markdown\" href=\"/quotes/create-a-quote.md\">\u003cscript data-mint-head type=\"application/ld+json\">{\"@context\":\"https://schema.org\",\"@graph\":[{\"@type\":\"Organization\",\"@id\":\"https://help.conficient.io/#organization\",\"name\":\"Conficient Help\",\"url\":\"https://help.conficient.io\",\"logo\":{\"@type\":\"ImageObject\",\"url\":\"https://mintcdn.com/conficient/u15AY9Pv4fMreuyc/logo/lockup-light.svg?fit=max\u0026auto=format\u0026n=u15AY9Pv4fMreuyc\u0026q=85\u0026s=6e368a01c30a5a1328f190ba0e3c62b9\"}},{\"@type\":\"WebSite\",\"@id\":\"https://help.conficient.io#website\",\"name\":\"Conficient Help\",\"url\":\"https://help.conficient.io\",\"publisher\":{\"@id\":\"https://help.conficient.io/#organization\"}},{\"@type\":\"WebPage\",\"@id\":\"https://help.conficient.io/quotes/create-a-quote#webpage\",\"url\":\"https://help.conficient.io/quotes/create-a-quote\",\"name\":\"Create a quote\",\"description\":\"Start a new quote, fill in the customer and site, add line items from your library, and send it to the customer.\",\"dateModified\":\"2026-10-17T05:38:25.444Z\",\"isPartOf\":{\"@id\":\"https://help.conficient.io#website\"},\"breadcrumb\":{\"@id\":\"https://help.conficient.io/quotes/create-a-quote#breadcrumb\"}},{\"@type\":\"BreadcrumbList\",\"@id\":\"https://help.conficient.io/quotes/create-a-quote#breadcrumb\",\"itemListElement\":[{\"@type\":\"ListItem\",\"position\":1,\"name\":\"Conficient Help\",\"item\":\"https://help.conficient.io\"},{\"@type\":\"ListItem\",\"position\":2,\"name\":\"Create a quote\",\"item\":\"https://help.conficient.io/quotes/create-a-quote\"}]},{\"@type\":[\"Article\",\"TechArticle\"],\"@id\":\"https://help.conficient.io/quotes/create-a-quote#article\",\"headline\":\"Create a quote\",\"name\":\"Create a quote\",\"description\":\"Start a new quote, fill in the customer and site, add line items from your library, and send it to the customer.\",\"url\":\"https://help.conficient.io/quotes/create-a-quote\",\"mainEntityOfPage\":{\"@id\":\"https://help.conficient.io/quotes/create-a-quote#webpage\"},\"dateModified\":\"2026-10-17T05:38:25.444Z\",\"publisher\":{\"@id\":\"https://help.conficient.io/#organization\"},\"isPartOf\":{\"@id\":\"https://help.conficient.io#website\"}}]}\u003c/script>\u003cscript data-mint-head type=\"application/ld+json\">{\"@context\":\"https://schema.org\",\"@type\":\"WebSite\",\"name\":\"Conficient Help\",\"creator\":{\"@type\":\"Organization\",\"name\":\"Mintlify\",\"url\":\"https://mintlify.com\"}}\u003c/script>","siteName":"Conficient Help","nav":{"global":null,"groups":[{"group":"Getting started","pages":[{"title":"Welcome to Conficient Help","sidebarTitle":"Welcome","description":"Step-by-step guides to quoting, running projects and getting paid with Conficient.","href":"/index"}]},{"group":"Quotes","pages":[{"title":"Create a quote","href":"/quotes/create-a-quote"}]}]},"title":"Create a quote - Conficient Help","buildId":"dpl_5UGCeHaPhSKbAExsKaHeR8dW3HyG","deploymentId":"dpl_5UGCeHaPhSKbAExsKaHeR8dW3HyG","dynamics":["07c022d89b","a74be98ba7"],"chunks":["Frame-DYrD4gCJ.js","DynamicMarkdown-BTVnG8lc.js","zoom-image-lightbox-DgtuyVql.js","PlusIcon-BCNs_Q8j.js","lightbox-handle-r17bVUz3.js"]}